Architecture , C# , dynamics-crm , powerplatform , tips
Dynamics CRM: Setup PowerApps.UIAutomation.Api for The UI Testing

Do you know that we can do UI Testing easily in Dynamics CRM? In this blog post, we will learn about how to set up a solution project for doing UI testing using the PowerApps.UIAutomation.Api nuget package. Like the naming, UI testing means that testing that being done automatically (via code) on the UI. Not like unit testing which focuses on testing a part of the system (as small as you can is the best), UI testing will be more of an integration test. The benefit of doing this kind of testing for me will be:
- Validate Front-End code (Javascript, Business Rule, etc) and also Back-End code (Workflow, Plugin, Flow).
- Integration testing means that the data will be recorded to the permanent database (not like unit testing in this blog post).
This blog post will be divided into 4 parts:
- Set up user login
- Set up machine environment
- Set up project
- Write sample test code
Set up User Login
When we want to run the UI testing, the framework will automatically help us to do the login part, we need to set up the account. As you know, nowadays Microsoft will force us to enable 2FA (2 Factory Authentication) and it makes the login part a little bit complex. So basically to generate an MFA secret key to be used in the framework. The original configuration I found here by username Shakevg. But I'll put it here also to make it easier for other people if they want to try this:
- Go to your Office365 'Security info' page at https://mysignins.microsoft.com/security-info
- Enter your O365 login and password
- Click 'Add method' and select "Authenticator app" in Combobox, click Add
- Click on the "I want to use a different authenticator app" link if you want to use
- not 'Microsoft Authenticator' authenticator app
- Click on the 'Next' button
- Click on the 'Next' button
- Click on 'Can't scan image?'
- Make a note of the 'Code' which is displayed
- Click the '+' to add an account and select 'work or school account'
- Scan the QR code displayed on the web page
- If the App displays a six-digit code, click 'Next' on the web page
- Enter the six-digit verification code from the app into the web page
- Click the 'Next' button
- Add your Code (MFA Secret) key with the spaces removed to your app.config as shown below, in the same section that you add your username and password
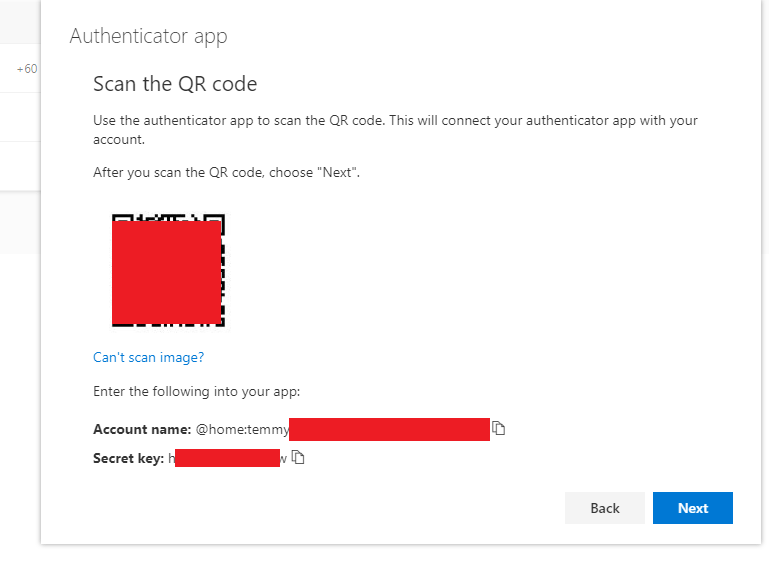 Setup account login
Write down the secret key to be used in the setup project step.
Setup Machine Environment
If you read in the PowerApps.UIAutomation.Api readme. You'll notice that the only browser that is supported now is Google Chrome (you need to install Google Chrome on your machine too). So you need to download Chrome driver (must match your browser version) here.
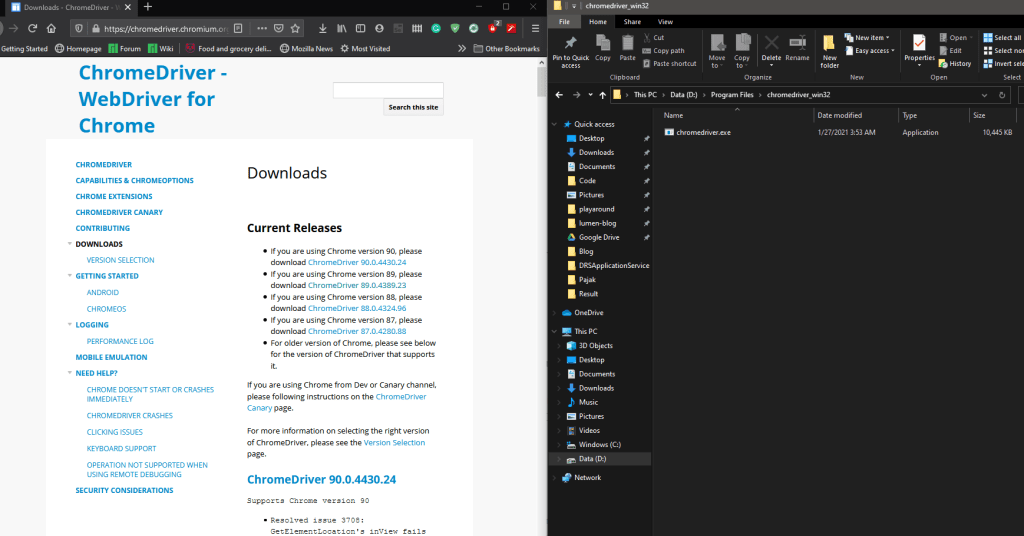 Chrome Driver folder
After downloading, you need to put the file into the folder you like and you need to write this folder path for the next step.
Setup the Project
Create a new Solution > Unit Test Project (.NET Framework). Make sure you choose .NET Framework 4.6.2 > Set the folder and click the OK button.
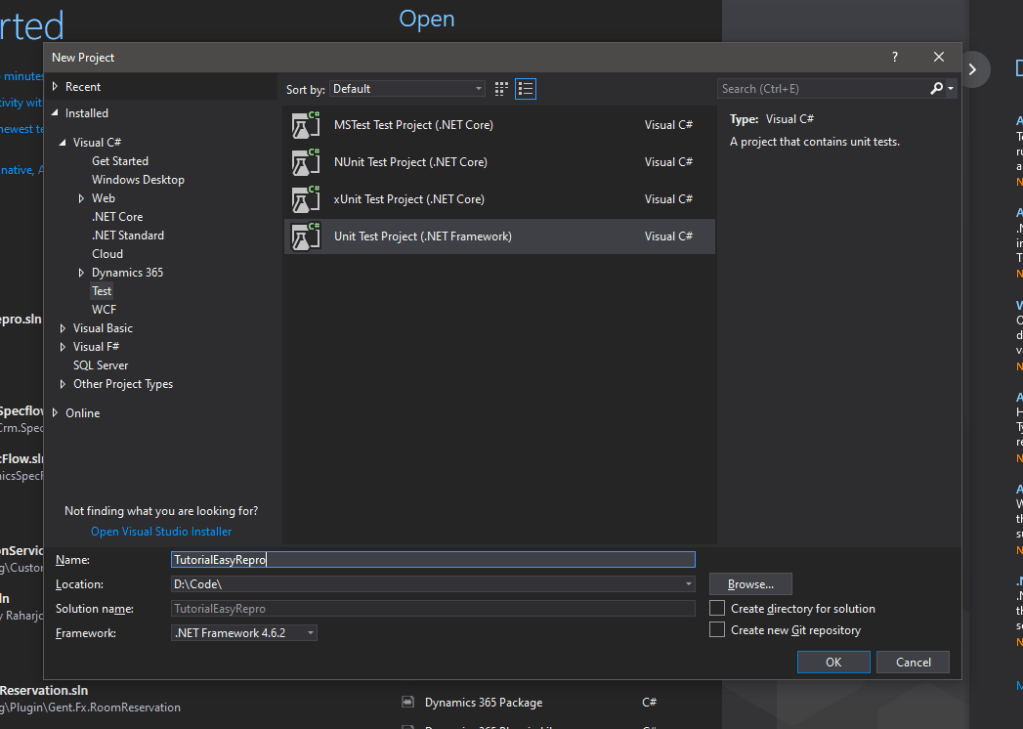 Create a unit test project
Open Manage Nuget Packages and install these 2:
Create App.config with this code inside (sample included):
<?xml version="1.0" encoding="utf-8" ?>
<configuration>
  <appSettings>
    <add key="OnlineUsername" value="temmy@insurgodev.onmicrosoft.com" />
    <add key="OnlinePassword" value="notarealpassword" />
    <add key="OnlineCrmUrl" value="https://insurgodev.crm5.dynamics.com" />
    <add key="MfaSecretKey" value="notarealsecretkey" />
    <add key="AzureKey" value="" />
    <!-- IE,Chrome,Firefox,Edge,Remote-->
    <add key="BrowserType" value="Chrome" />
    <add key="DriversPath" value="D:\Program Files\chromedriver_win32\" />
    <add key="UsePrivateMode" value="true" />
    <!-- The following settings are only used if BrowserType = "Remote" above -->
    <add key="RemoteBrowserType" value="Chrome" />
    <add key="RemoteHubServer" value="http://1.1.1.1:4444/wd/hub" />
  </appSettings>
</configuration>
You can put the secret key that you get from the previous step into the MfaSecretKeyvalue.
Change the DriversPath's value to the folder you create from the previous step.
This is the full Packages.config after the installation:
<?xml version="1.0" encoding="utf-8"?>
<packages>
  <package id="Dynamics365.UIAutomation.Api" version="9.2.21014.138" targetFramework="net462" />
  <package id="MSTest.TestAdapter" version="1.3.2" targetFramework="net462" />
  <package id="MSTest.TestFramework" version="1.3.2" targetFramework="net462" />
  <package id="Newtonsoft.Json" version="9.0.1" targetFramework="net462" />
  <package id="Otp.NET" version="1.2.1" targetFramework="net462" />
  <package id="PowerApps.UIAutomation.Api" version="9.0.2" targetFramework="net462" />
  <package id="Selenium.Support" version="3.141.0" targetFramework="net462" />
  <package id="Selenium.WebDriver" version="3.141.0" targetFramework="net462" />
</packages>
Sample Test Code
After all the steps above are done, now we will try to write a pretty simple test case. I had a Custom App and Custom Entity name new_customdocument. This table mainly only has 2 attributes (new_name and new_description) that we will fill in based on the code. Here is the full code of it:
using System;
using System.Configuration;
using System.IO;
using System.Security;
using Microsoft.Dynamics365.UIAutomation.Api.UCI;
using Microsoft.Dynamics365.UIAutomation.Browser;
using Microsoft.VisualStudio.TestTools.UnitTesting;
namespace TutorialEasyRepro
{
    [TestClass]
    public class CreateCustomDocument
    {
        private readonly SecureString _username = ConfigurationManager.AppSettings["OnlineUsername"].ToSecureString();
        private readonly SecureString _password = ConfigurationManager.AppSettings["OnlinePassword"].ToSecureString();
        private readonly SecureString _mfaSecretKey = ConfigurationManager.AppSettings["MfaSecretKey"].ToSecureString();
        private readonly Uri _xrmUri = new Uri(ConfigurationManager.AppSettings["OnlineCrmUrl"]);
        [TestMethod]
        public void CustomDocument_Create_Valid()
        {
            var client = new WebClient(Common.Options);
            using (var app = new XrmApp(client))
            {
                app.OnlineLogin.Login(_xrmUri, _username, _password, _mfaSecretKey);
                app.Navigation.OpenApp("Blog App");
                app.Navigation.OpenSubArea("Custom Documents");
                app.CommandBar.ClickCommand("New");
                app.Entity.SetValue("new_name", "temmy_raharjo");
                app.Entity.SetValue("new_description", "from easy repro");
                app.Entity.Save();
            }
        }
    }
    public class Common
    {
        private static readonly string Type = ConfigurationManager.AppSettings["BrowserType"];
        private static readonly string RemoteType = ConfigurationManager.AppSettings["RemoteBrowserType"];
        private static readonly string RemoteHubServerUrl = ConfigurationManager.AppSettings["RemoteHubServer"];
        private static readonly string DriversPath = ConfigurationManager.AppSettings["DriversPath"] ?? string.Empty;
        private static readonly bool UsePrivateMode = Convert.ToBoolean(ConfigurationManager.AppSettings["UsePrivateMode"] ?? bool.TrueString);
        // Once you change this instance will affect all follow tests executions
        public static BrowserOptions SharedOptions = new BrowserOptions
        {
            BrowserType = (BrowserType)Enum.Parse(typeof(BrowserType), Type),
            PrivateMode = UsePrivateMode,
            FireEvents = false,
            Headless = false,
            UserAgent = false,
            DefaultThinkTime = 2000,
            RemoteBrowserType = (BrowserType)Enum.Parse(typeof(BrowserType), RemoteType),
            RemoteHubServer = new Uri(RemoteHubServerUrl),
            UCITestMode = true,
            UCIPerformanceMode = true,
            DriversPath = Path.IsPathRooted(DriversPath) ? DriversPath : Path.Combine(Directory.GetCurrentDirectory(), DriversPath),
            DisableExtensions = false,
            DisableFeatures = false,
            DisablePopupBlocking = false,
            DisableSettingsWindow = false,
            EnableJavascript = false,
            NoSandbox = false,
            DisableGpu = false,
            DumpDom = false,
            EnableAutomation = false,
            DisableImplSidePainting = false,
            DisableDevShmUsage = false,
            DisableInfoBars = false,
            TestTypeBrowser = false
        };
        public static BrowserOptions Options => new BrowserOptions
        {
            BrowserType = SharedOptions.BrowserType,
            PrivateMode = SharedOptions.PrivateMode,
            FireEvents = SharedOptions.FireEvents,
            Headless = SharedOptions.Headless,
            UserAgent = SharedOptions.UserAgent,
            DefaultThinkTime = SharedOptions.DefaultThinkTime,
            RemoteBrowserType = SharedOptions.RemoteBrowserType,
            RemoteHubServer = SharedOptions.RemoteHubServer,
            UCITestMode = SharedOptions.UCITestMode,
            UCIPerformanceMode = SharedOptions.UCIPerformanceMode,
            DriversPath = SharedOptions.DriversPath,
            DisableExtensions = SharedOptions.DisableExtensions,
            DisableFeatures = SharedOptions.DisableFeatures,
            DisablePopupBlocking = SharedOptions.DisablePopupBlocking,
            DisableSettingsWindow = SharedOptions.DisableSettingsWindow,
            EnableJavascript = SharedOptions.EnableJavascript,
            NoSandbox = SharedOptions.NoSandbox,
            DisableGpu = SharedOptions.DisableGpu,
            DumpDom = SharedOptions.DumpDom,
            EnableAutomation = SharedOptions.EnableAutomation,
            DisableImplSidePainting = SharedOptions.DisableImplSidePainting,
            DisableDevShmUsage = SharedOptions.DisableDevShmUsage,
            DisableInfoBars = SharedOptions.DisableInfoBars,
            TestTypeBrowser = SharedOptions.TestTypeBrowser
        };
    }
}
After you build the project, then you can check on your Test Explorer window and run it. Here is the demonstration from my code:
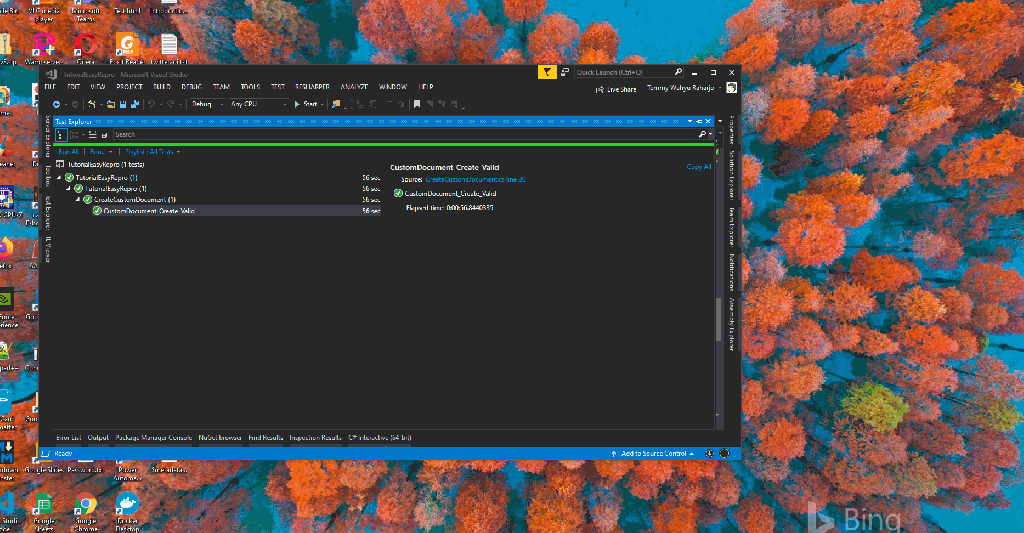 Demonstration of how the test running
Summary
For me, this one is considered a pretty neat feature that we can implement in our organization. Just what I need to know is more into validating the result after we can create directly from UI (hybrid between invoking in UI + retrieving in DB from the code). For sure you need to check the more detailed APIs that they provide on their GitHub page (clone the project and take a look at their sample).
What do you think?
Leave a comment
Your comment is sent privately to the author and isn't published on the site.