Architecture , Azure , C# , powerplatform
Dataverse - Azure Aware Plugin + Service Bus Queue + Azure Function + Dataverse Custom API

Today, we will learn how to make use of the Azure Service Bus Queue to be implemented alongside Dataverse. The idea is Azure Service Bus Queue offers mechanism to make requests well-ordered which can be a way to make sure that your data is processed in the correct order. The flow that we will build for today will be like the below:
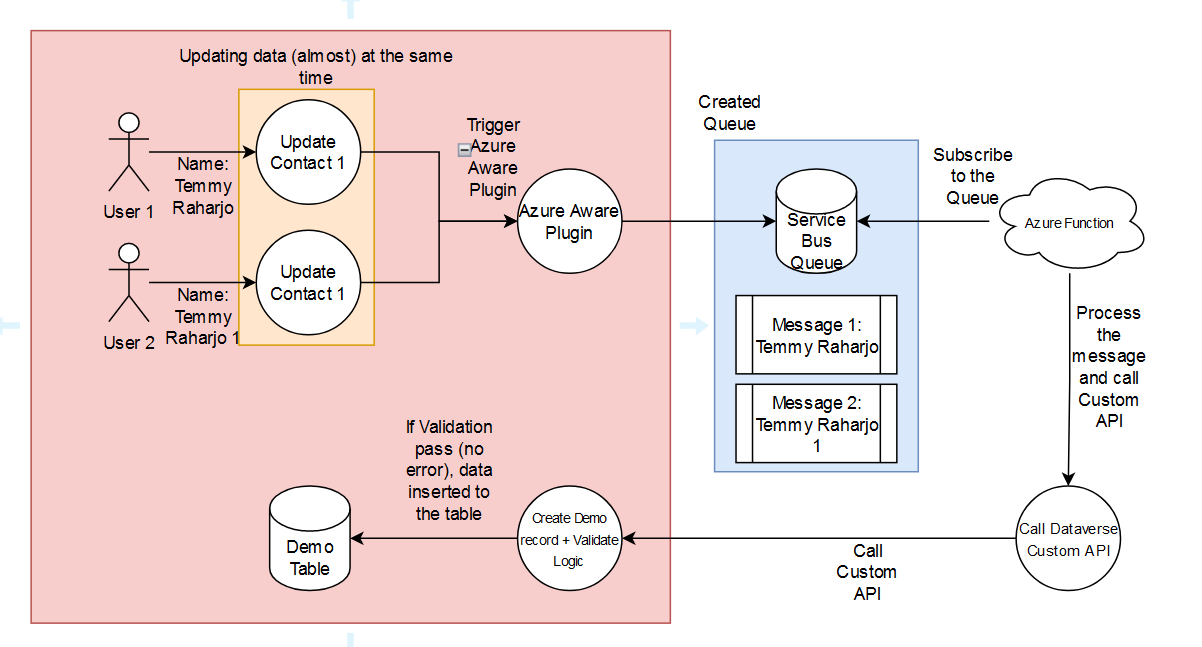
For example, there are two users that update the same data (almost) at the same time. Here, as you can see from the flow above, the data will trigger our Azure Aware Plugin. The benefit of using Azure Aware Plugin is we can send the Queue Message with very minimal effort. Once the queue is created, the Azure Function (that is already subscribed) will kick in and process the message. Then, the function will create a connection to Dataverse and call Dataverse Custom API to do the next operation (validating and creating the Demo record). Without further ado, here is the implementation!
Prepare the Service Bus Stuff
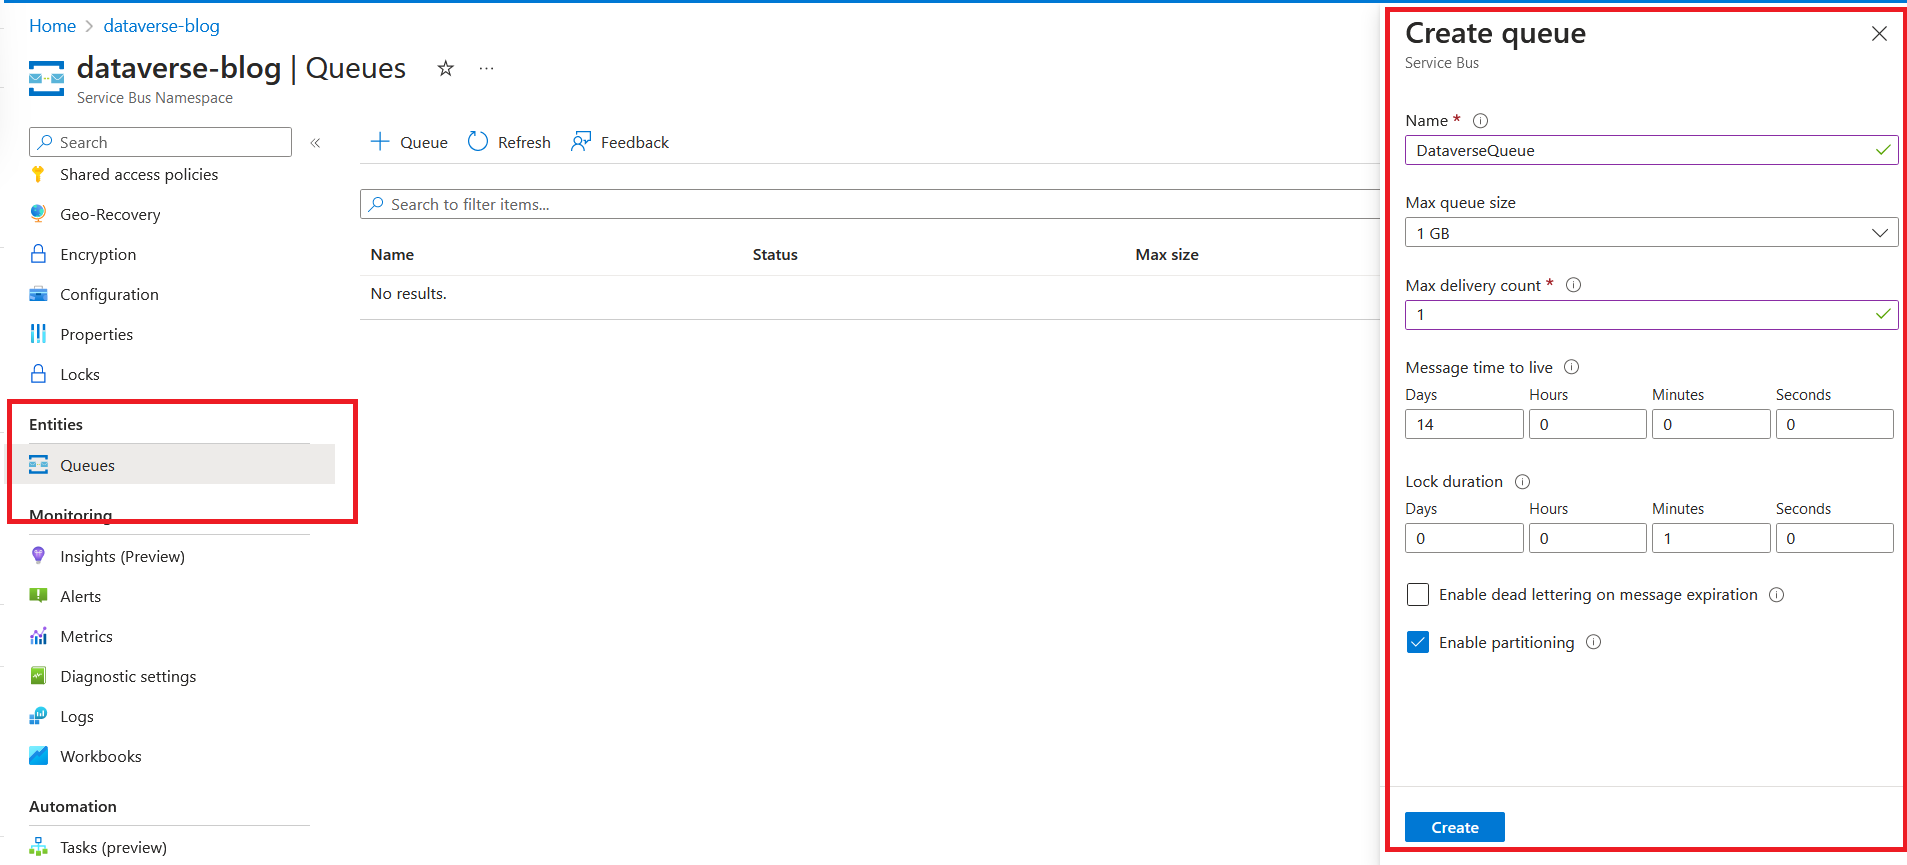
Once you created the Service Bus Name > go to the Queues and create the Queue:
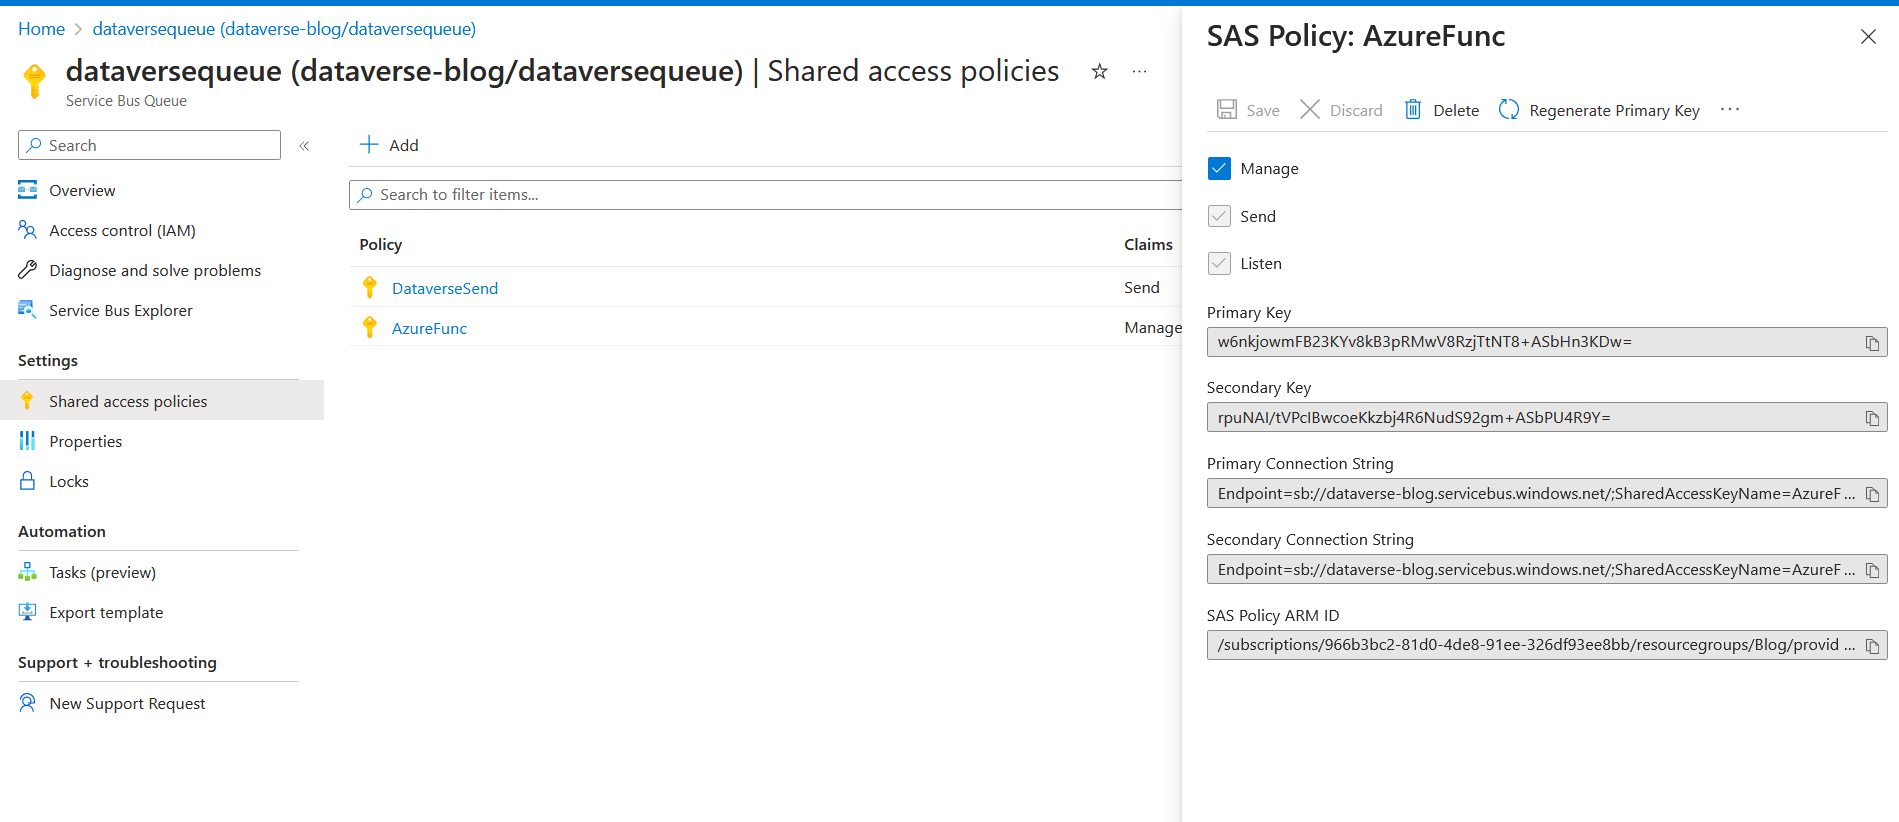
Next, we need to create Shared access policies to be used on the Dataverse side. As you can see, I select Send policy:

Once created, you can get the Primary Connection String that will be used on the Dataverse.
Register Azure Aware Plugin
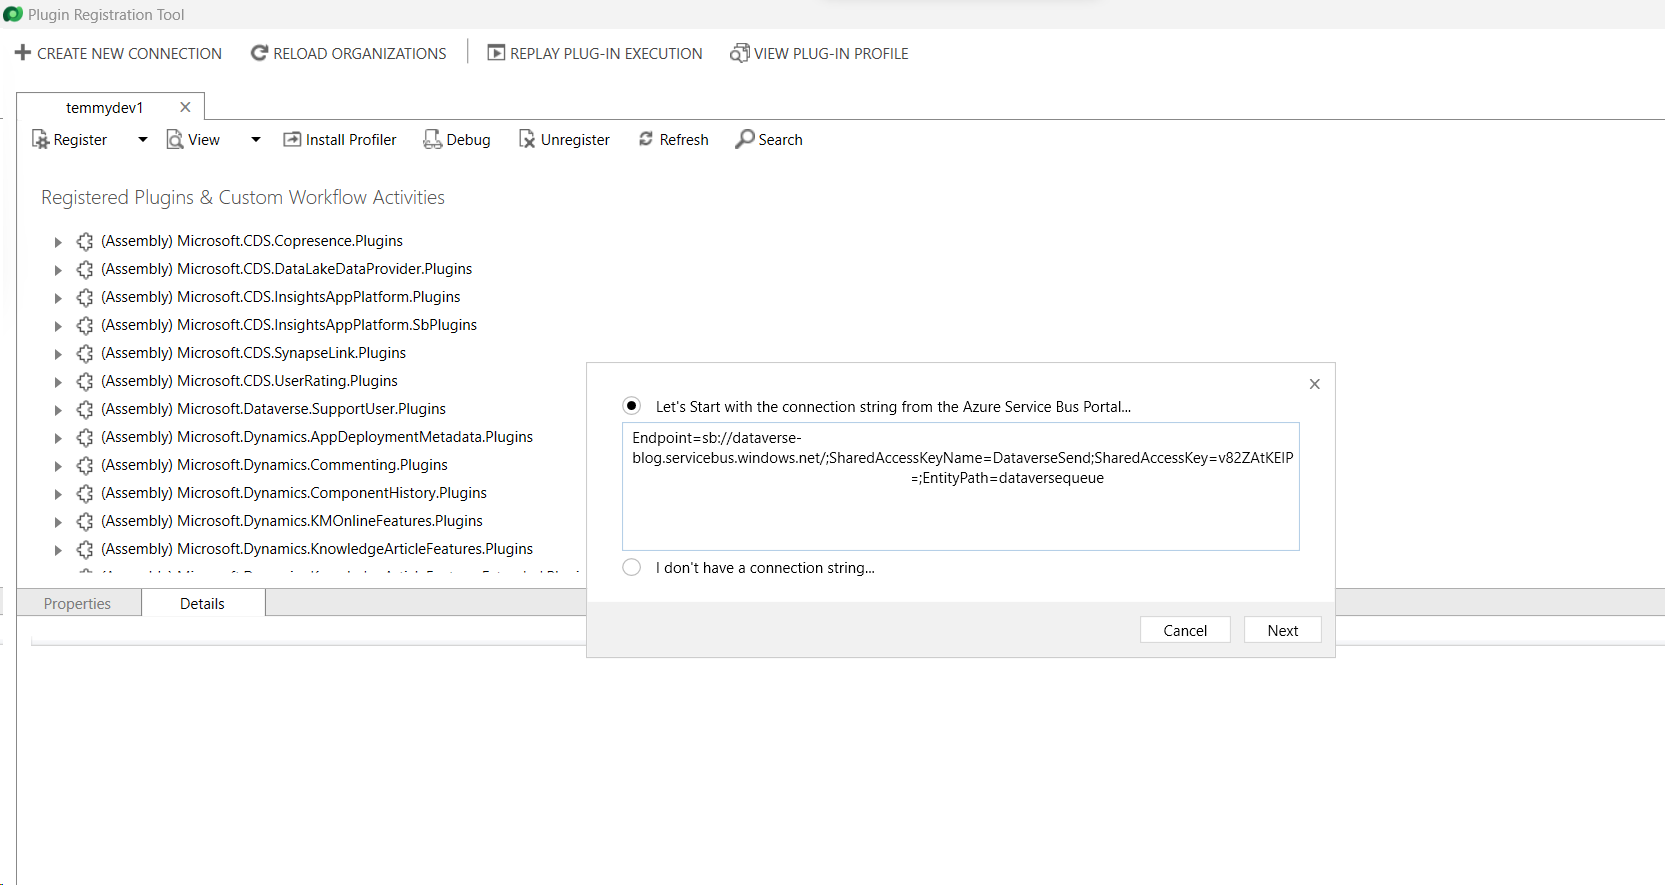
Now you need to open your Plugin Registration Tools > Register > Register New Service Endpoint. In the dialog, you need to paste the "Primary Connection String" that you get earlier:
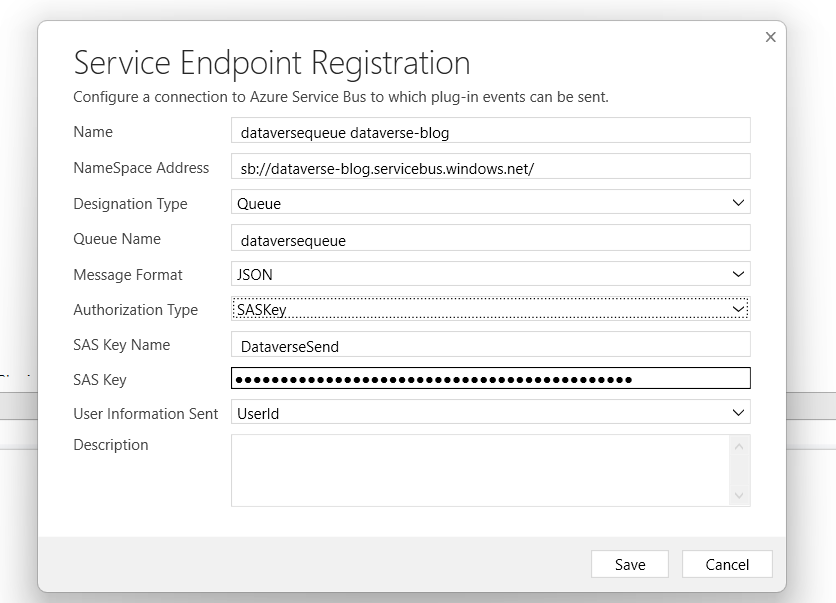
When you click the Next button, all the information will be listed in the below dialog. For the Message Format, I choose JSON:
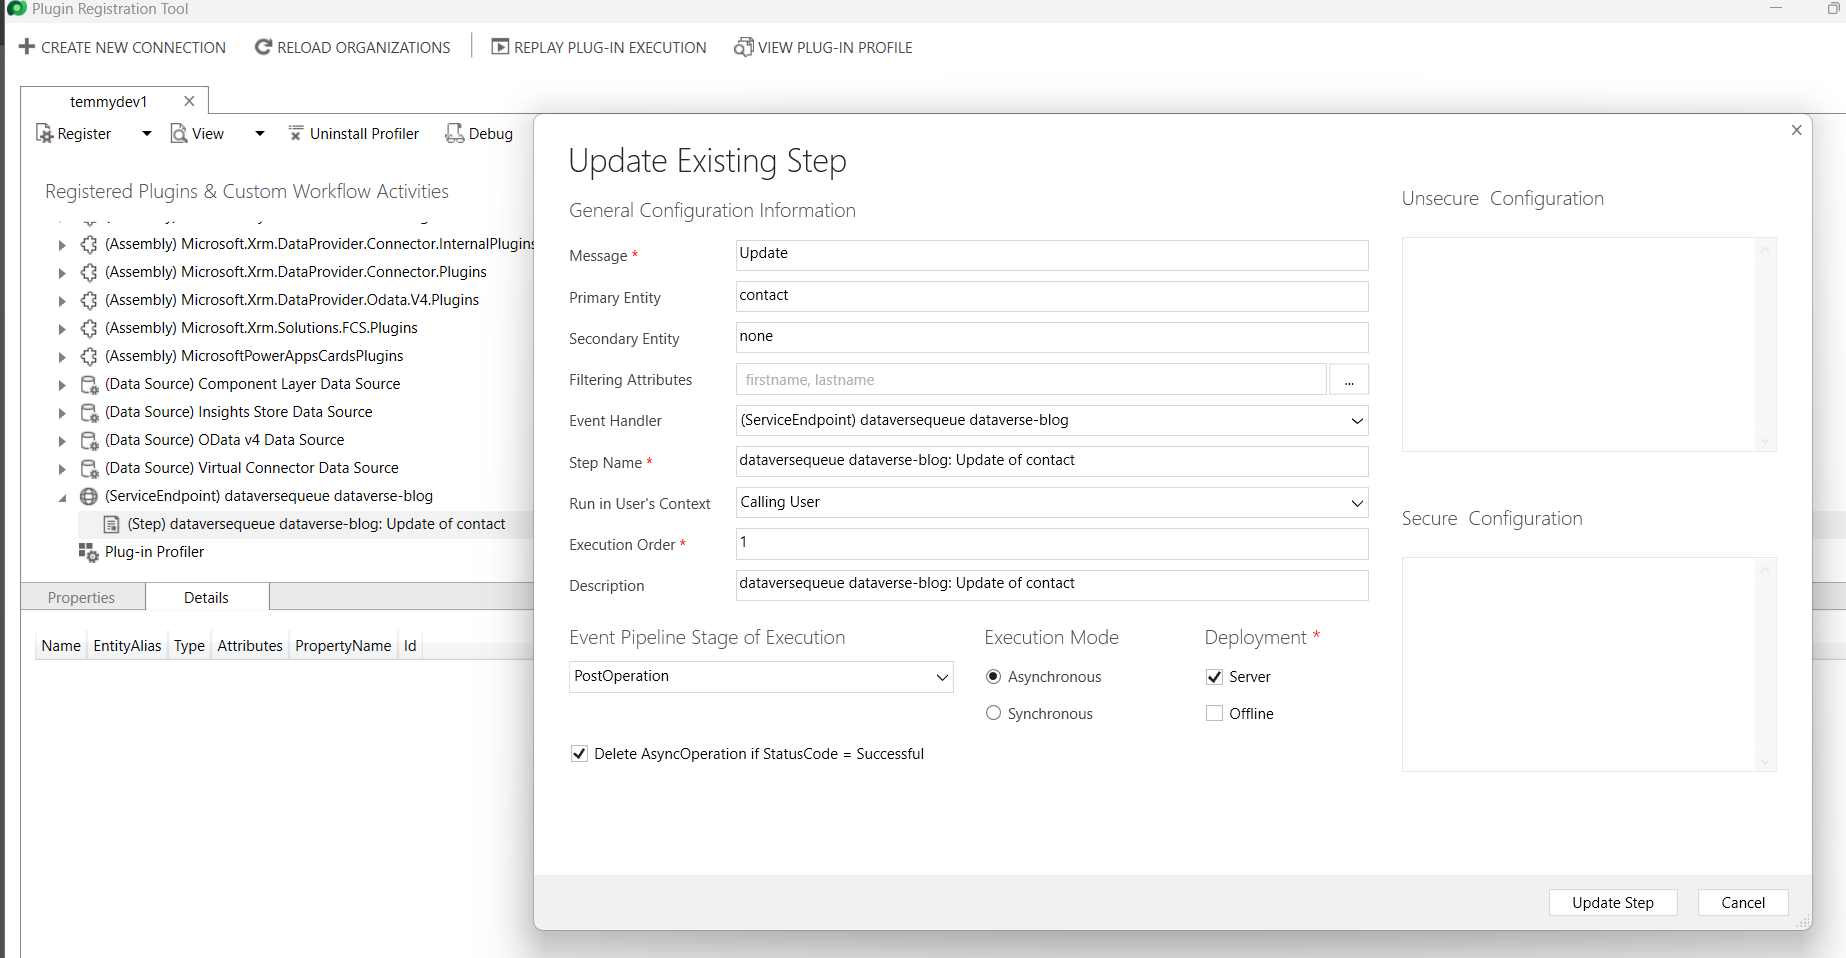
In the last part of this section, you need to register a new plugin step for the Service Endpoint you created earlier. In the below image, you can see I set the plugin step when Update - Contact. I also choose the Post-Async:
Until this step, you can test to Update your data (Contact). Then you can go to your Queue and check if there's a message there.
Create Custom API
To make the plugin project, I like to use "pac plugin init". Once the project is created, you need to make sure you update the PluginBase.cs this part:
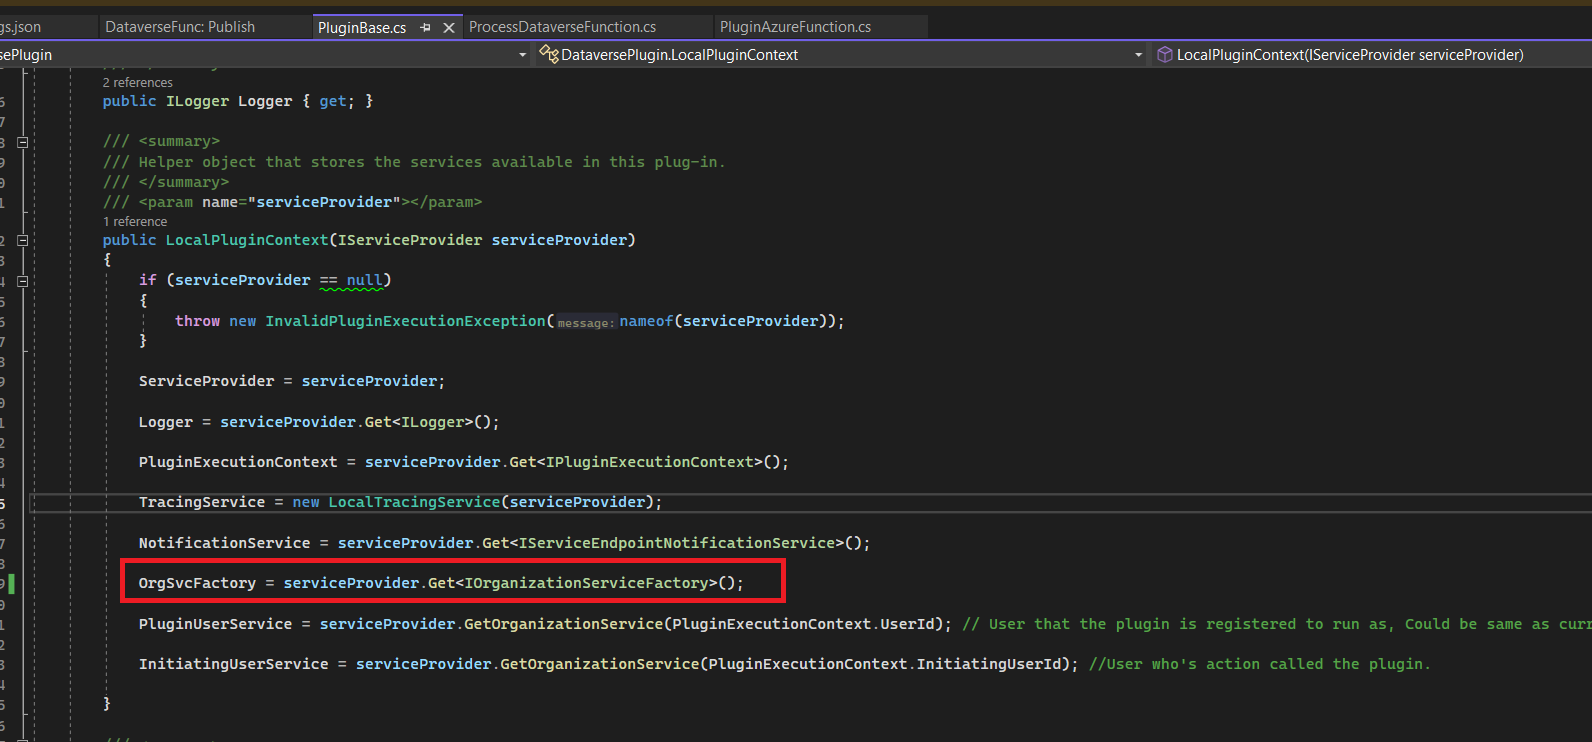
If you did not update the above part, then you will get an "Object Reference not set" error when the Custom API is called later on.
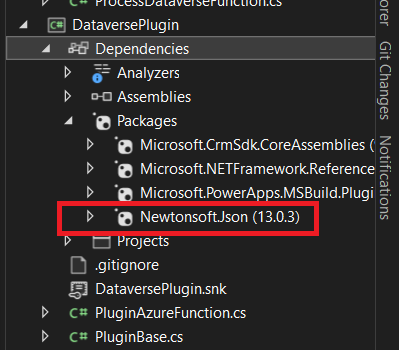
We also need to install "Newtonsoft.Json" because we need to deserialize the JSON easily:
Next, we need to prepare the Custom API. Here is the code of the API that I will create:
using Microsoft.Xrm.Sdk;
using System;
using System.Threading;
using Microsoft.Xrm.Sdk.Extensions;
using Microsoft.Xrm.Sdk.Query;
using Newtonsoft.Json;
using SharedLib;
namespace DataversePlugin
{
    public class PluginAzureFunction : PluginBase
    {
        public PluginAzureFunction(string unsecureConfiguration, string secureConfiguration)
            : base(typeof(PluginAzureFunction))
        {
        }
        protected override void ExecuteDataversePlugin(ILocalPluginContext localPluginContext)
        {
            if (localPluginContext == null)
            {
                throw new ArgumentNullException(nameof(localPluginContext));
            }
            var context = localPluginContext.PluginExecutionContext;
            var input = JsonConvert.DeserializeObject<PluginAzureFunctionConst.PluginAzureFunctionInput>(
                context.InputParameterOrDefault<string>(PluginAzureFunctionConst.InputKey));
            var target = context.InputParameterOrDefault<Entity>(PluginAzureFunctionConst.TargetKey);
            if (target.LogicalName != "contact") return;
            var service = localPluginContext.OrgSvcFactory.CreateOrganizationService(input.UserId);
            var contactData = service.Retrieve("contact", target.Id, new ColumnSet(true));
            var demo = new Entity("tmy_demo");
            var firstName = target.GetAttributeValue<string>("firstname") ??
                            contactData.GetAttributeValue<string>("firstname");
            var lastName = target.GetAttributeValue<string>("lastname") ??
                           contactData.GetAttributeValue<string>("lastname");
            // Because RowVersion can't properly updated by CRM, we need to rely on the below logic comparing the firstname of Target vs data retrieved
            if ((target.Contains("firstname") && contactData.GetAttributeValue<string>("firstname") != target.GetAttributeValue<string>("firstname")) ||
                (target.Contains("lastname") && contactData.GetAttributeValue<string>("lastname") != target.GetAttributeValue<string>("lastname")))
                throw new InvalidPluginExecutionException("Concurrency problem..");
            demo["tmy_name"] = $"{firstName} {lastName} - {target.RowVersion}";
            demo["tmy_contact"] = target.ToEntityReference();
            service.Create(demo);
        }
    }
}
I also created Shared Project (to be shared among the plugin project and Azure Function project) with the below code:
using System;
namespace SharedLib
{
    public class PluginAzureFunctionConst
    {
        public const string InputKey = "Input";
        public const string TargetKey = "Target";
        public class PluginAzureFunctionInput
        {
            public Guid UserId { get; set; }
        }
    }
}
If you see at the code above, you will understand that the Custom API will receive two parameters. The first one is the JSON object that contains the UserId (in the future, if you need more parameters, you can add them easily from the PluginAzureFunctionInput definition). But, for now, this class will only contain a User Id to create the correct Organization Service (impersonation). The second parameter is the state of the updated Contact which I'm using for validation. If the First Name or the Last Name of the Target is not the same as the current data (after retrieval). Then we can throw an error. Else, we can create a Demo record.
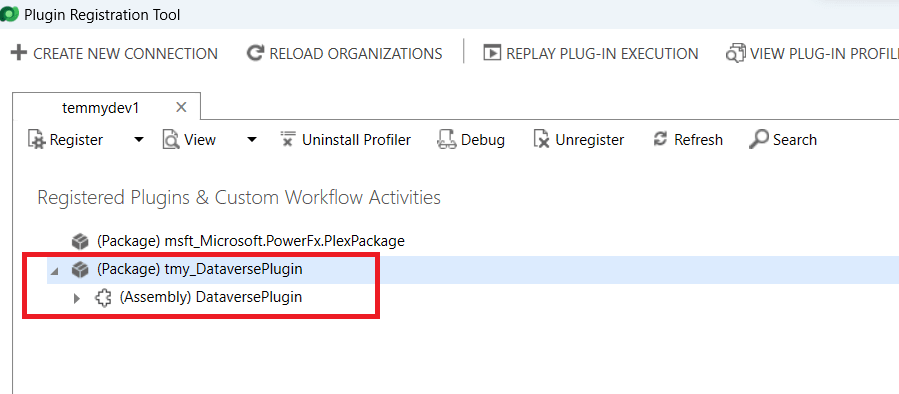
After you build > go to your PRT > Register New Package > and select your Package:
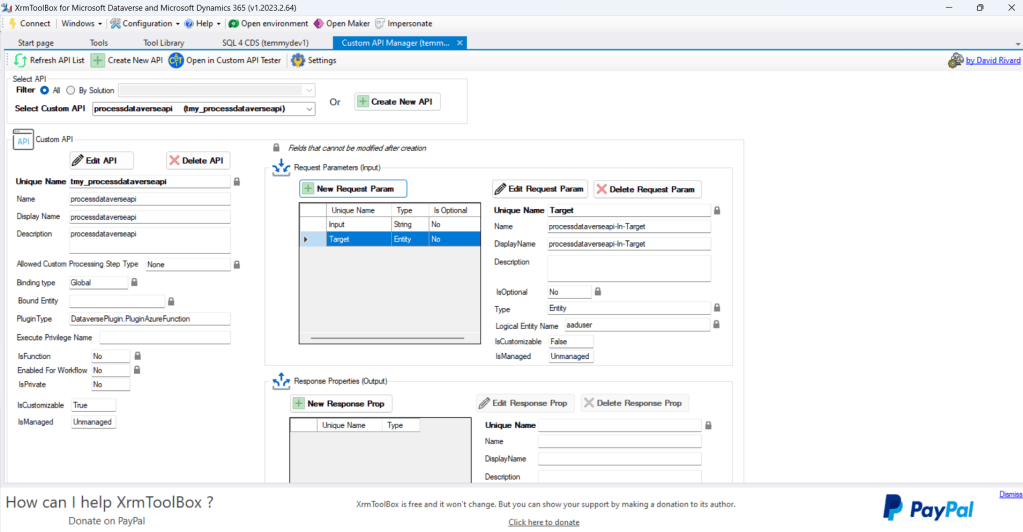
Like always, to create the Custom API definition, I will use my favorite XrmToolBox> Custom API Manager by David Rivard. Here is my Custom API definition:
Create Azure Function
Before we do the code, go to your Service Bus Queue > Shared access policies and create another policy to Manage (Send + Listen) the Queue. Copy the Primary Connection string for later:
If you did not yet have the Azure Function template on your Visual Studio, you need to execute the below command in your Terminal:
dotnet new install "Microsoft.Azure.WebJobs.ProjectTemplates"
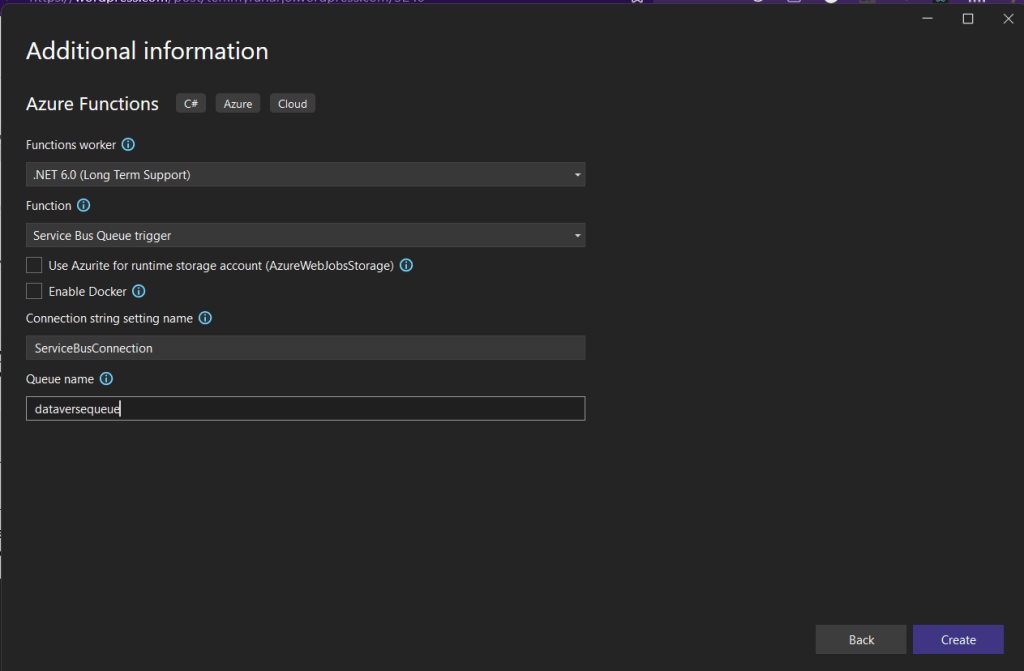
Next, go to your Visual Studio > create new Project > select Azure Functions > give the name of the Project and the location that you wanted > give the connection string name and the queue name like the one that you generated before:
Here is the Azure Function Code that I applied:
using System;
using System.IO;
using System.Text;
using Microsoft.Azure.WebJobs;
using Microsoft.Extensions.Logging;
using Microsoft.PowerPlatform.Dataverse.Client;
using Microsoft.Xrm.Sdk;
using Microsoft.Xrm.Sdk.Query;
using Newtonsoft.Json;
using SharedLib;
namespace DataverseFunc
{
    public class ProcessDataverseFunction
    {
        [FunctionName("ProcessDataverseFunction")]
        public void Run([ServiceBusTrigger("dataversequeue",
            Connection = "ServiceBusConnection")]string message, ILogger log)
        {
            var executionContext = DeserializeJsonString<RemoteExecutionContext>(message);
            var target = (Entity)executionContext.InputParameters["Target"];
            var dataverseConnection =
                "AuthType=ClientSecret;url=https://yourcrminstance.crm5.dynamics.com;ClientId=your-client-id;ClientSecret=your-client-secret";
            var service = new ServiceClient(dataverseConnection, log);
            var req = new OrganizationRequest("tmy_processdataverseapi")
            {
                [PluginAzureFunctionConst.InputKey] = JsonConvert.SerializeObject(new PluginAzureFunctionConst.PluginAzureFunctionInput { UserId = executionContext.UserId }),
                [PluginAzureFunctionConst.TargetKey] = target
            };
            service.ExecuteAsync(req);
            log.LogInformation($"C# ServiceBus queue trigger function processed message: {message}");
        }
        public TRemoteContextType DeserializeJsonString<TRemoteContextType>(string jsonString)
        {
            //create an instance of generic type object
            TRemoteContextType obj = Activator.CreateInstance<TRemoteContextType>();
            MemoryStream ms = new MemoryStream(Encoding.Unicode.GetBytes(jsonString));
            System.Runtime.Serialization.Json.DataContractJsonSerializer serializer = new System.Runtime.Serialization.Json.DataContractJsonSerializer(obj.GetType());
            obj = (TRemoteContextType)serializer.ReadObject(ms);
            ms.Close();
            return obj;
        }
    }
}
As you can see, the Azure Function code is actually pretty simple. It just gets the message > create a connection to Dataverse > call the API that we created earlier.
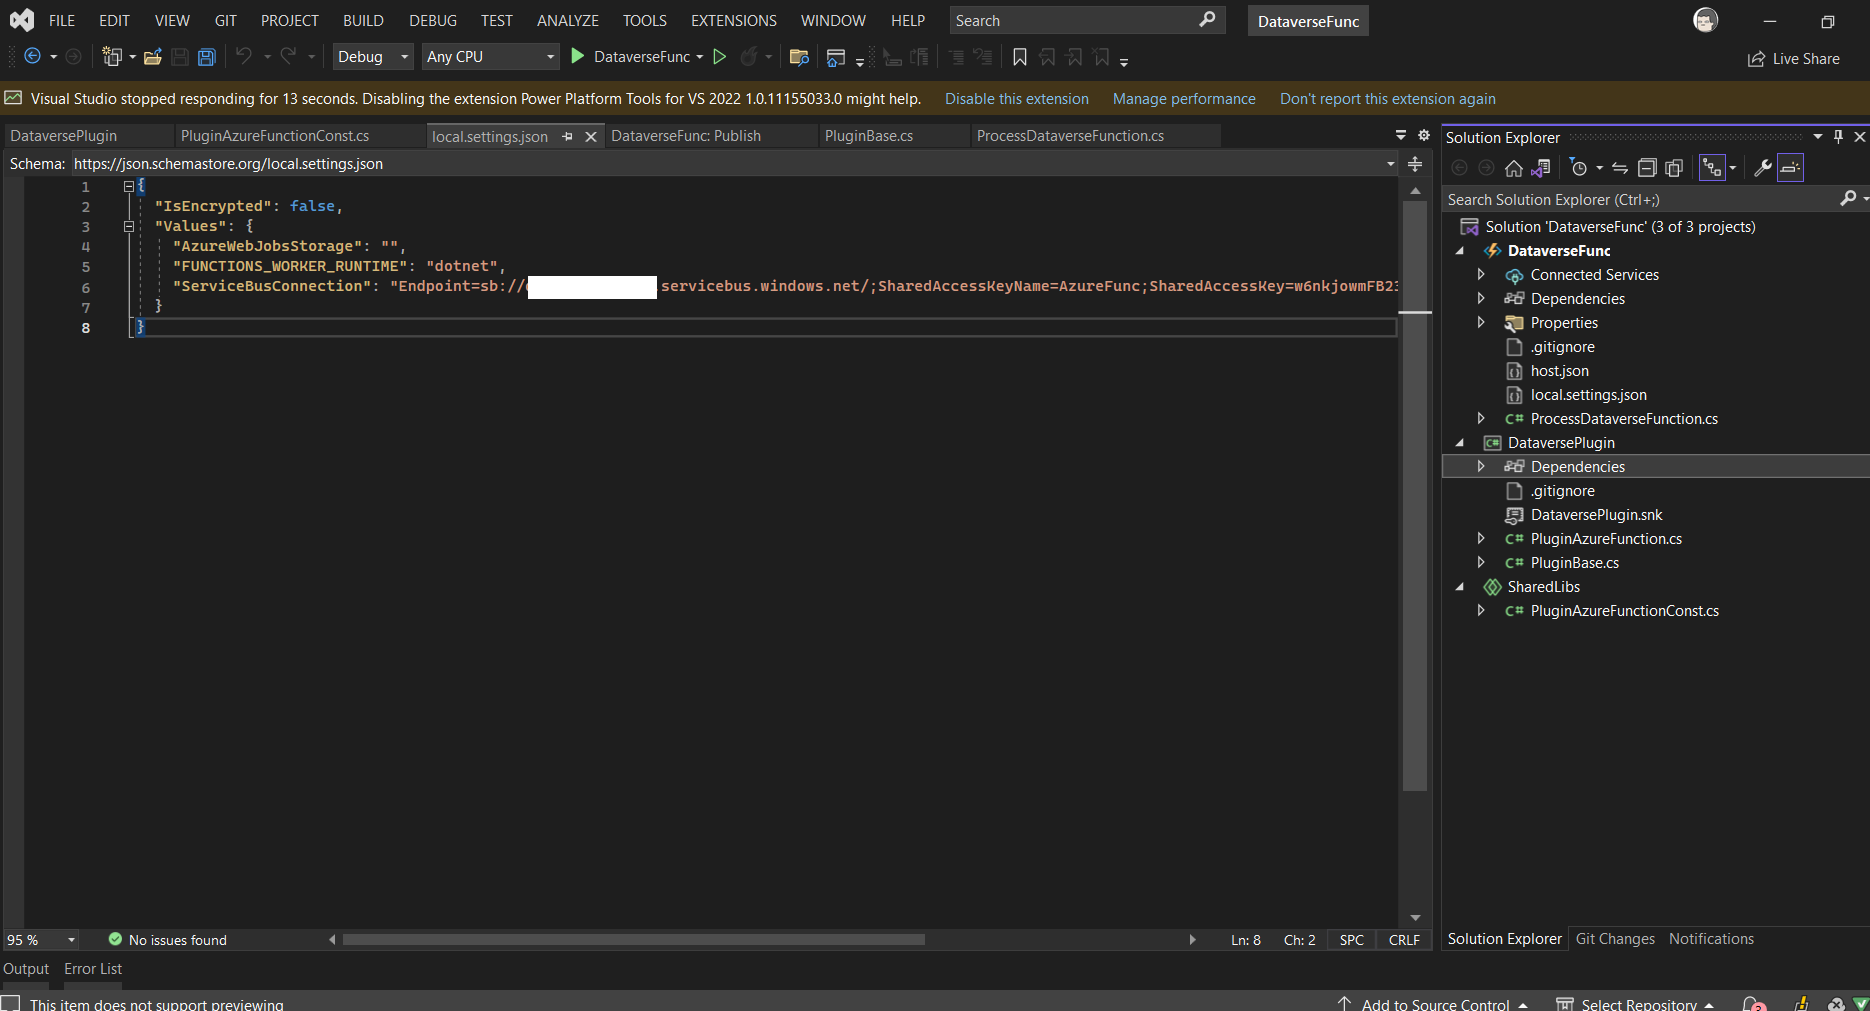
Until this step, you can try the Azure Function on your local machine to make sure that everything is okay. But you need to fill in the ServiceBusConnection in your local.settings.json:
If everything is okay, you can deploy the function to be hosted on Azure. You just need to right-click on the Azure Function Project > Publish. Then you will get confirmation to create a new Function or select the existing one. But for this demonstration, I created a new Function App (Windows):
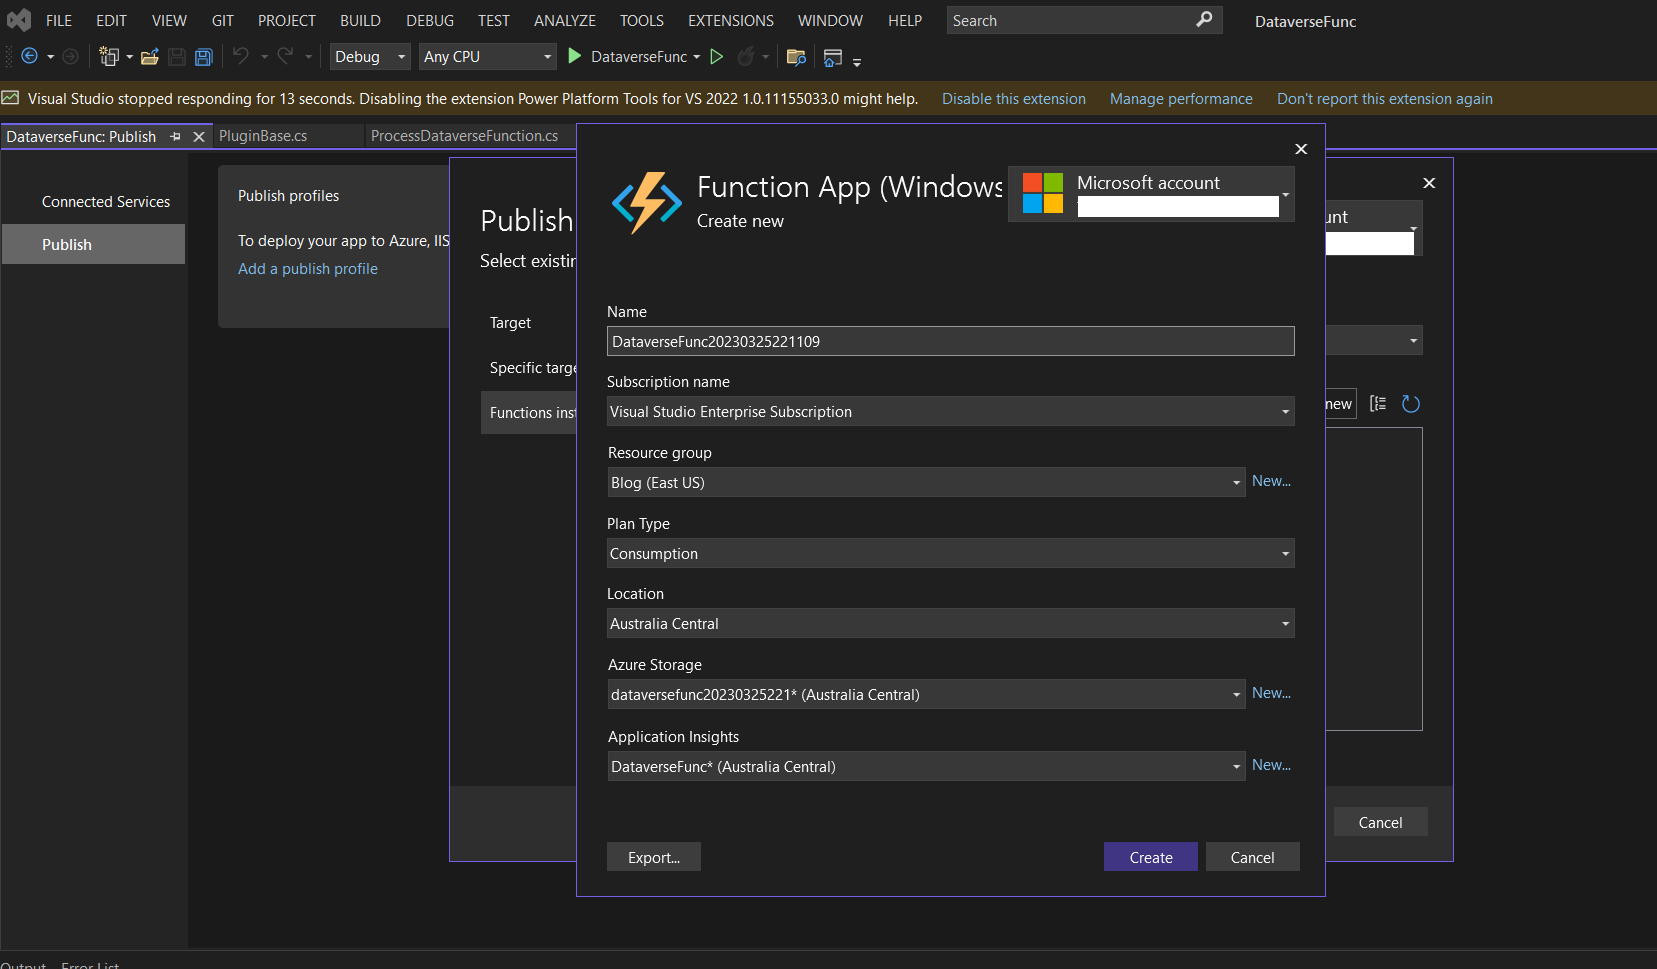
Once you created (follow the instruction), the Publish Profile will be created and you can click Publish to deploy your Function App.
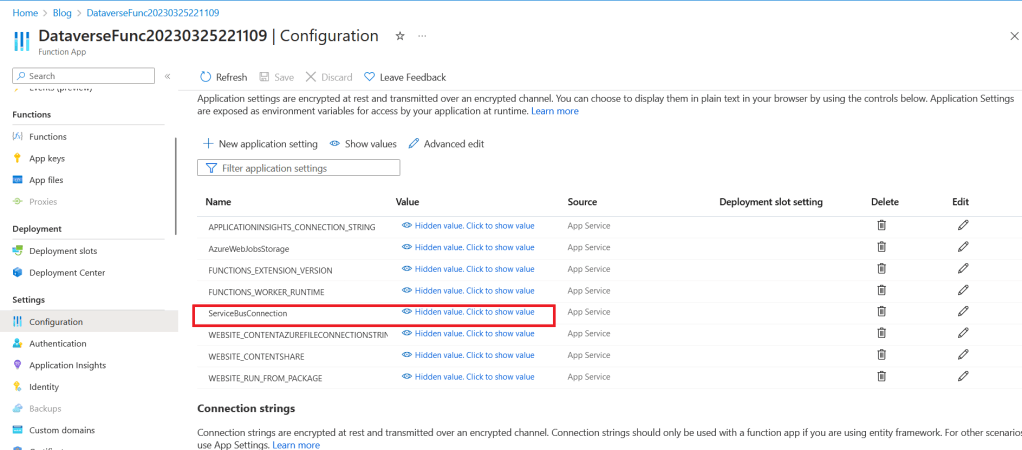
After the deployment is done, go to your Function App > Configuration > You need to create the ServiceBusConnection (you can get the value from the Primary Connection String of your SAS Policy you created earlier):
Demo
Here is the result:
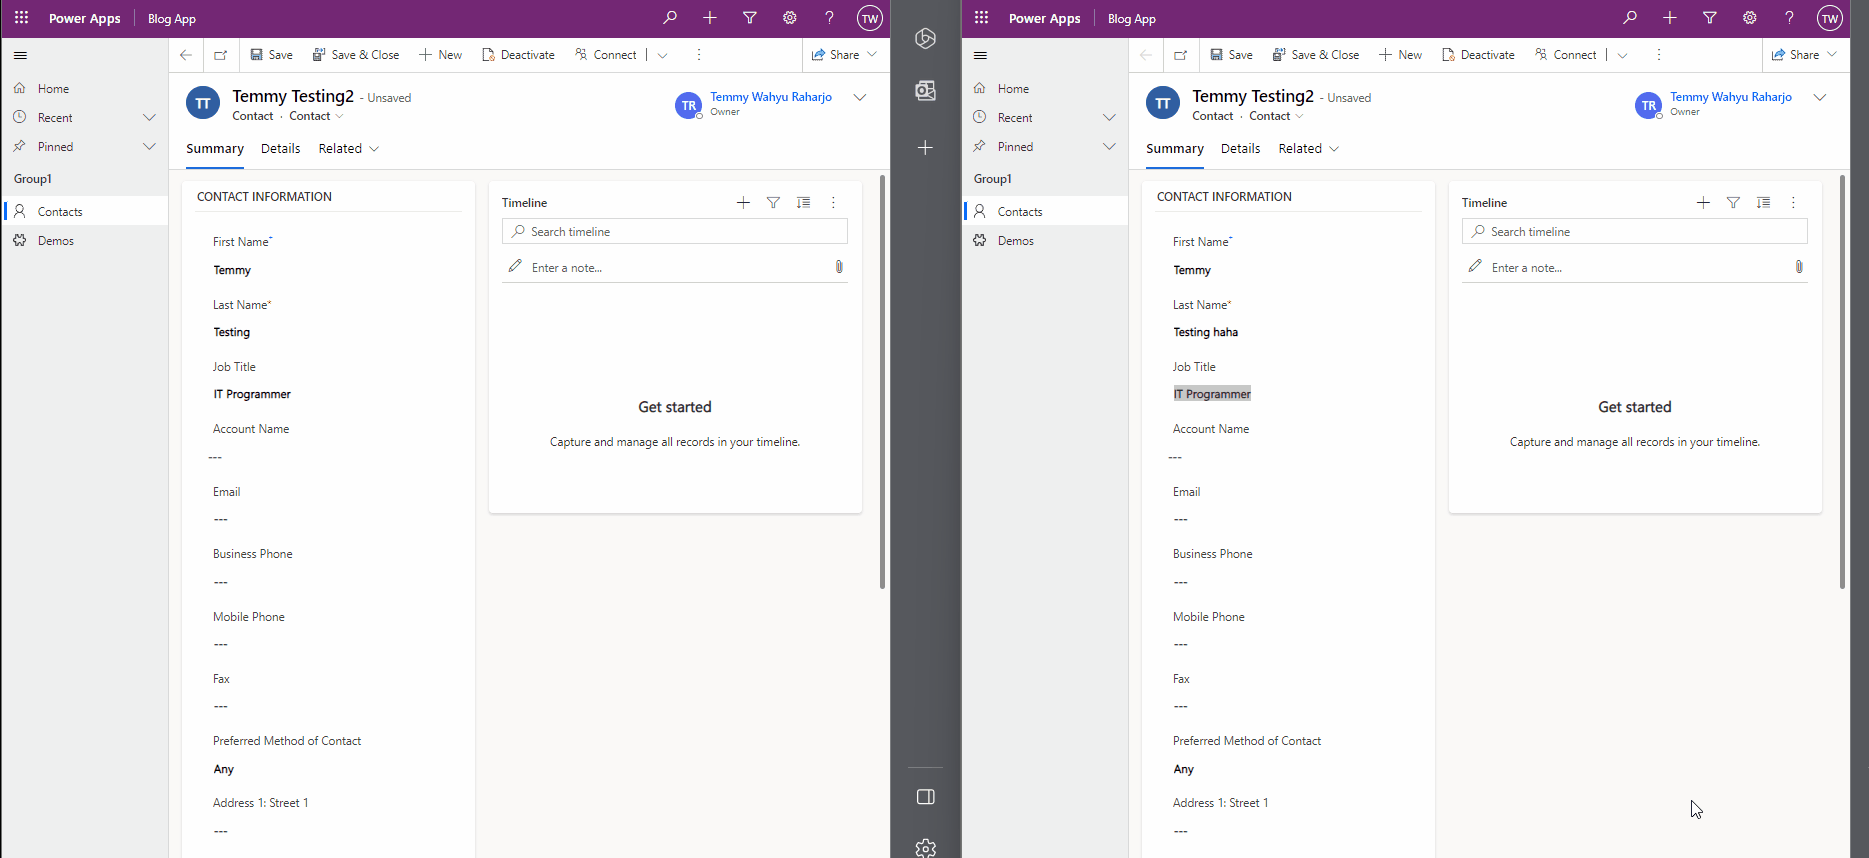
As you can see from the above demonstration, the system will accept the first request. But the second request will be rejected. But you need to understand as per the architecture design that we chose, the error will not be displayed to the user (only can be seen from Plugin Trace Log).
Happy CRM-ing!
Leave a comment
Your comment is sent privately to the author and isn't published on the site.