dynamics-crm , low-code , powerautomate
Power Automate: Create Flow to Send App Registration - Secret Expired On

Have you ever forgotten to create a new secret for your Azure App Registrationcausing your application to error? The problem with the UI is we can't detect when the secret will expire. And of course, I'm too lazy to open 1 by 1 to check when the secrets will expire!
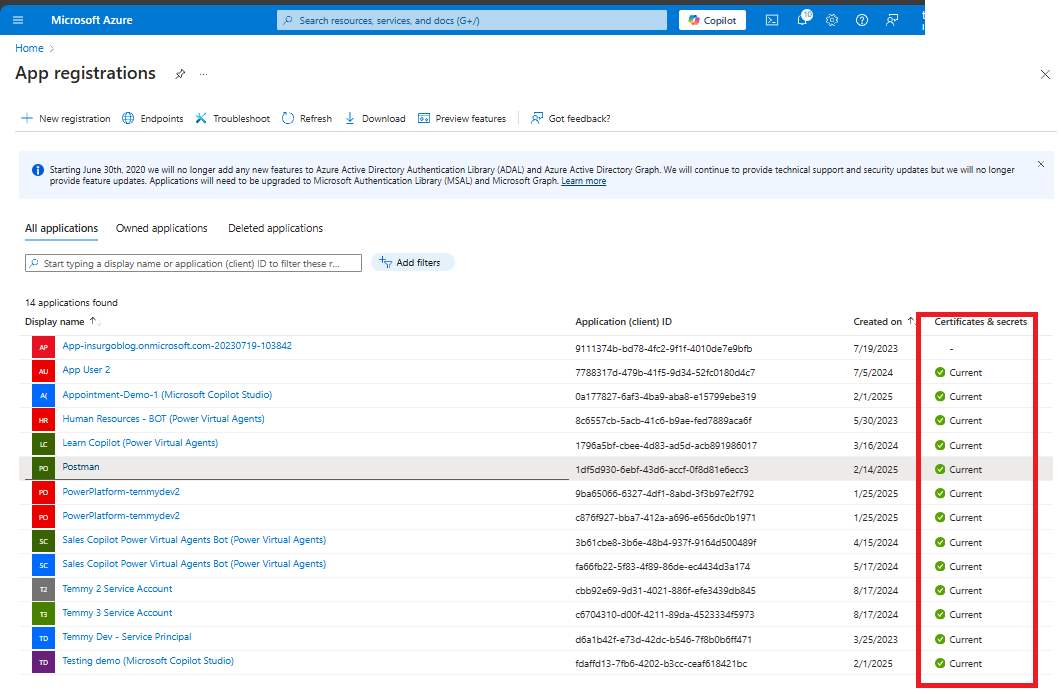
From the UI, we only know if the secrets are still valid
Hence, we need to have a better approach which for me is to create reminders (you can change the trigger e.g. to send the email once per month, weekly basis, etc) to help you monitor it. Fortunately for us, Microsoft Graphcan provide that data, and with the use of Power Automate, we can make this reminder easily!
Setting App Registration Permissions
You can create a new App Registration/use your existing App Registration. Basically what you need to add is the below:
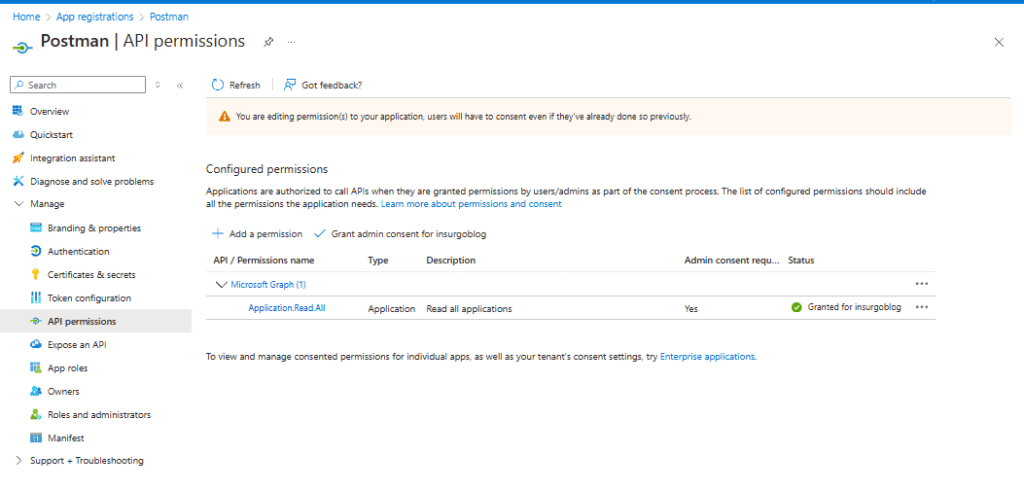
Add API permissions
Basically, you need to give only Application.Read.All. Once done, you need to create/get the secret, go to the Overview tab to get the TenantId and ClientId.
Power Automate
To trigger this email, I'm using Manually Trigger Flow and passing TenantId, ClientId, and also the Secret there for simplicity purposes. You can change this implementation to whatever method you think is more secure.
Next, we need to get the Access Token for the MS Graph:
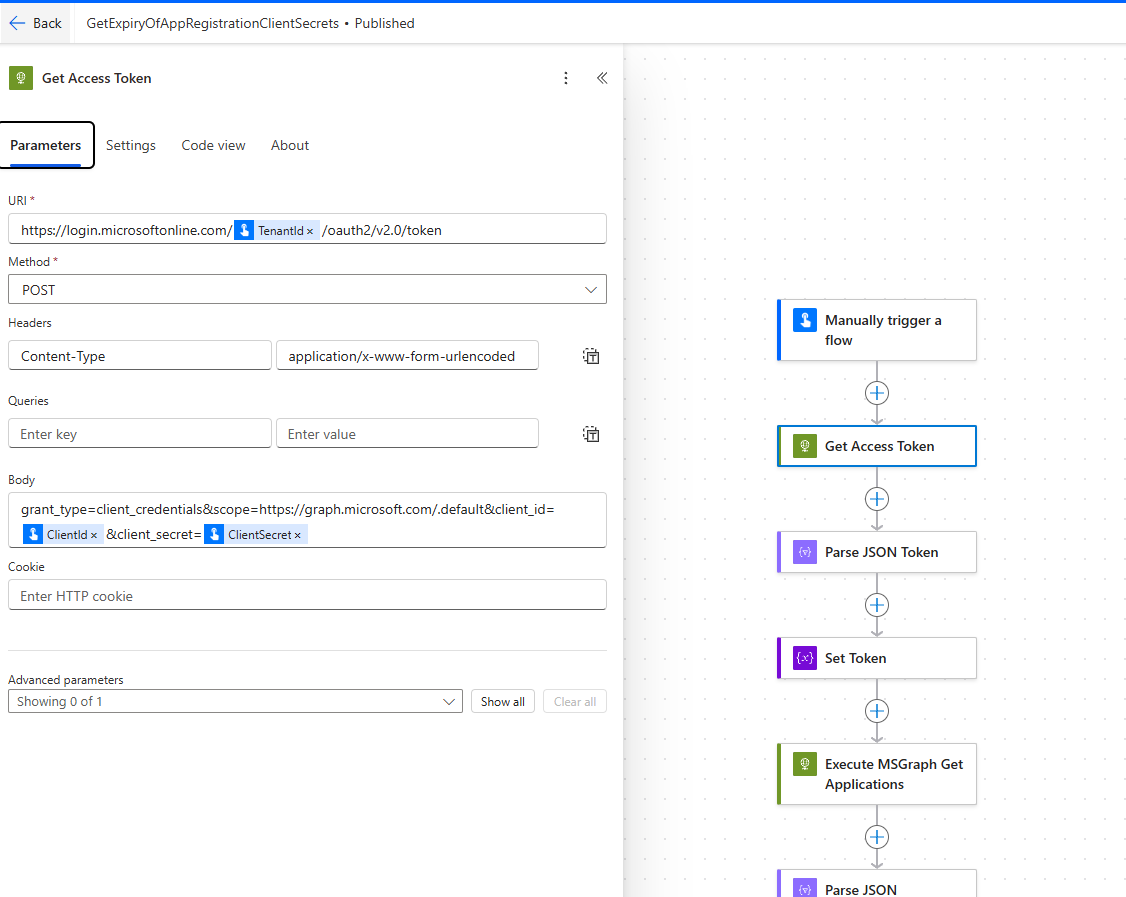
Get Access Token
I also provide you the Code view so you can refer to this action easily:
{
  "type": "Http",
  "inputs": {
    "uri": "https://login.microsoftonline.com/@{triggerBody()?['text']}/oauth2/v2.0/token",
    "method": "POST",
    "headers": {
      "Content-Type": "application/x-www-form-urlencoded"
    },
    "body": "grant_type=client_credentials&scope=https://graph.microsoft.com/.default&client_id=@{triggerBody()?['text_1']}&client_secret=@{triggerBody()?['text_2']}"
  },
  "runAfter": {},
  "runtimeConfiguration": {
    "contentTransfer": {
      "transferMode": "Chunked"
    }
  },
  "metadata": {
    "operationMetadataId": "da49e565-4db5-498b-979b-725286a11cf8"
  }
}
Once we execute the above, we can call the Parse JSON action with the below code view:
{
    "type": "object",
    "properties": {
        "token_type": {
            "type": "string"
        },
        "expires_in": {
            "type": "integer"
        },
        "ext_expires_in": {
            "type": "integer"
        },
        "access_token": {
            "type": "string"
        }
    }
}
Next, we can dump the "access_token" string into a variable and we can set the HTTP Request to call the MS Graph:
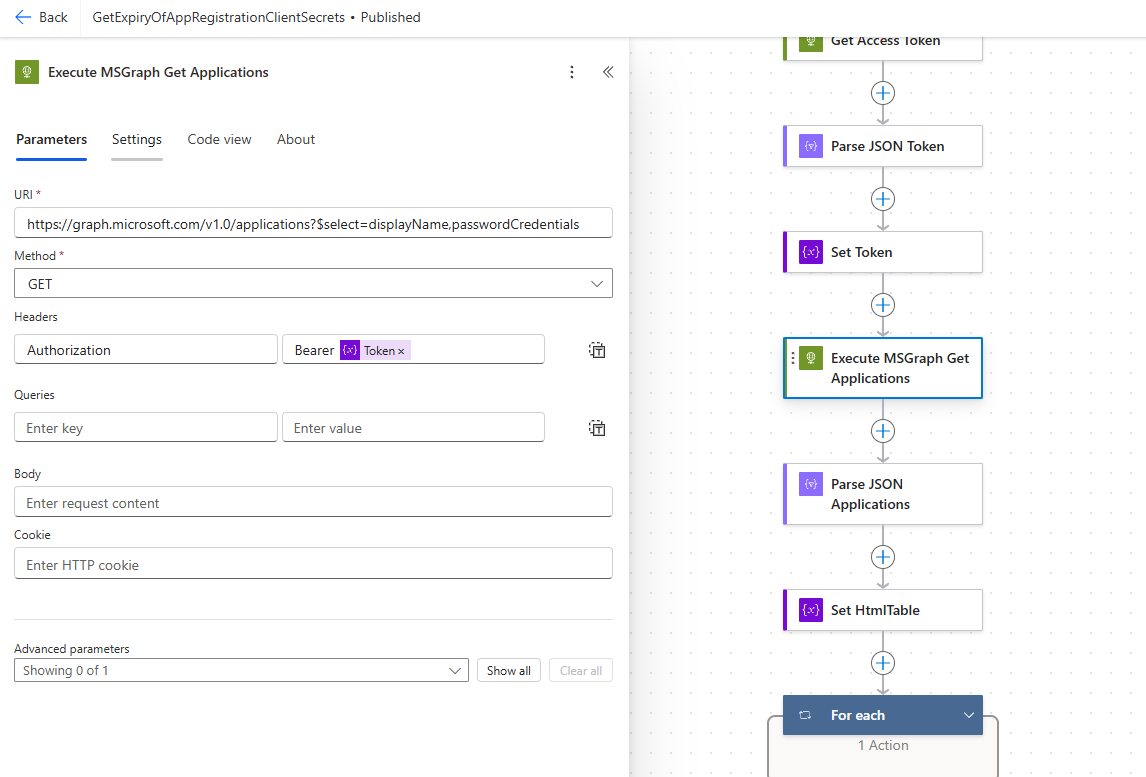
Execute MSGraph Get Applications
Here is the code of the above action:
{
  "type": "Http",
  "inputs": {
    "uri": "https://graph.microsoft.com/v1.0/applications?$select=displayName,passwordCredentials",
    "method": "GET",
    "headers": {
      "Authorization": "Bearer @{variables('Token')}"
    }
  },
  "runAfter": {
    "Set_Token": [
      "Succeeded"
    ]
  },
  "runtimeConfiguration": {
    "contentTransfer": {
      "transferMode": "Chunked"
    }
  },
  "metadata": {
    "operationMetadataId": "3b5ead14-6941-440d-9f69-8435c6bb4188"
  }
}
Again, we need to call Parse JSON to get the information above:
{
  "type": "ParseJson",
  "inputs": {
    "content": "@body('Execute_MSGraph_Get_Applications')",
    "schema": {
      "type": "object",
      "properties": {
        "@@odata.context": {
          "type": "string"
        },
        "value": {
          "type": "array",
          "items": {
            "type": "object",
            "properties": {
              "displayName": {
                "type": "string"
              },
              "passwordCredentials": {
                "type": "array"
              }
            },
            "required": [
              "displayName",
              "passwordCredentials"
            ]
          }
        }
      }
    }
  },
  "runAfter": {
    "Execute_MSGraph_Get_Applications": [
      "Succeeded"
    ]
  },
  "metadata": {
    "operationMetadataId": "bcdd69e6-4310-4502-9304-bcc7f65813d8"
  }
}
Once we have done the above steps. We actually already have all the information needed. So, these steps will just construct the output for the email. First, we need to create a String variable to store the HTML Table that will be set in the email with the below value:
<table style="border-collapse: collapse; width: 100%;">
  <tr>
    <th style="border: 1px solid #ddd; padding: 8px; background-color: #f2f2f2;">App Registration</th>
    <th style="border: 1px solid #ddd; padding: 8px; background-color: #f2f2f2;">Secret Name</th>
    <th style="border: 1px solid #ddd; padding: 8px; background-color: #f2f2f2;">Expired On</th>
  </tr>
Next, we need to loop the value of the JSON array and get the necessary information:
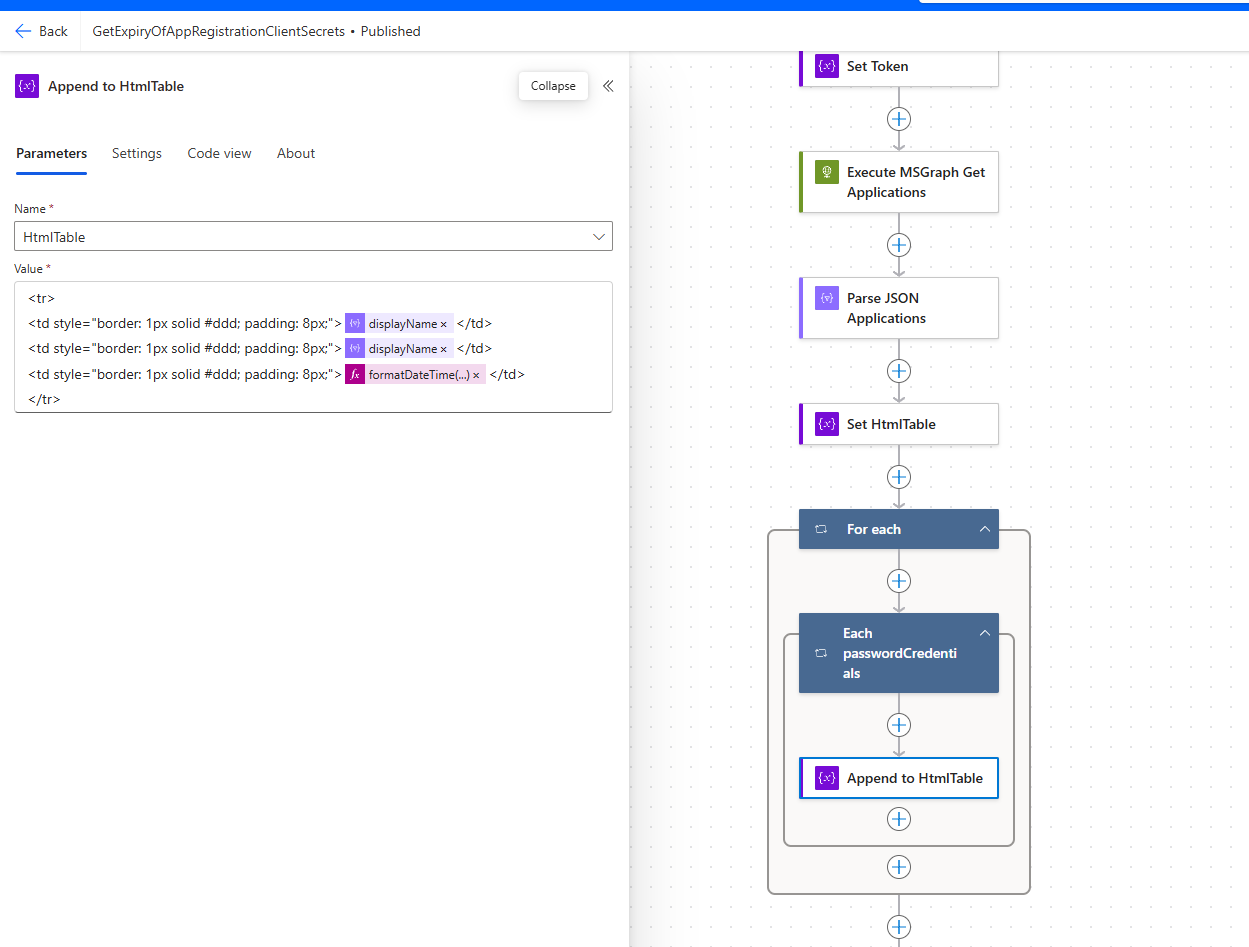
For each action
The full code for the For each action:
{
  "type": "Foreach",
  "foreach": "@outputs('Parse_JSON_Applications')?['body']?['value']",
  "actions": {
    "Each_passwordCredentials": {
      "type": "Foreach",
      "foreach": "@items('For_each')?['passwordCredentials']",
      "actions": {
        "Append_to_HtmlTable": {
          "type": "AppendToStringVariable",
          "inputs": {
            "name": "HtmlTable",
            "value": "<tr>\n<td style=\"border: 1px solid #ddd; padding: 8px;\">@{items('For_each')?['displayName']}</td>\n<td style=\"border: 1px solid #ddd; padding: 8px;\">@{items('Each_passwordCredentials')?['displayName']}</td>\n<td style=\"border: 1px solid #ddd; padding: 8px;\">@{formatDateTime(convertFromUtc(items('Each_passwordCredentials')?['endDateTime'], 'Singapore Standard Time'), 'dd-MM-yyyy hh:mm:ss tt')}</td>\n</tr>"
          },
          "metadata": {
            "operationMetadataId": "2fb84169-89b0-4db3-84ba-682f15a74eb7"
          }
        }
      },
      "metadata": {
        "operationMetadataId": "d99536c7-7207-456d-8179-2f68b1627ae9"
      }
    }
  },
  "runAfter": {
    "Set_HtmlTable": [
      "Succeeded"
    ]
  },
  "metadata": {
    "operationMetadataId": "325039e1-319c-4a71-9972-e742430a53b3"
  }
}
As you can see in the above, we basically loop the outputs('Parse_JSON_Applications')?['body'] and also items('For_each')?['passwordCredentials']. Then for the "endDateTime" we will convert the UTC date to SGT time and also change the format to "dd-MM-yyyy hh:mm:ss tt" to make it nicer in the output.
Next, we just need to close the HtmlTable variable:
<img src="https://temmyraharjo.wordpress.com/wp-content/uploads/2025/02/image-13.png" alt="Close HtmlTable variable with
Close HtmlTable variable with </table> string
Last, we just need to call Outlook Send Email and pass the necessary information:
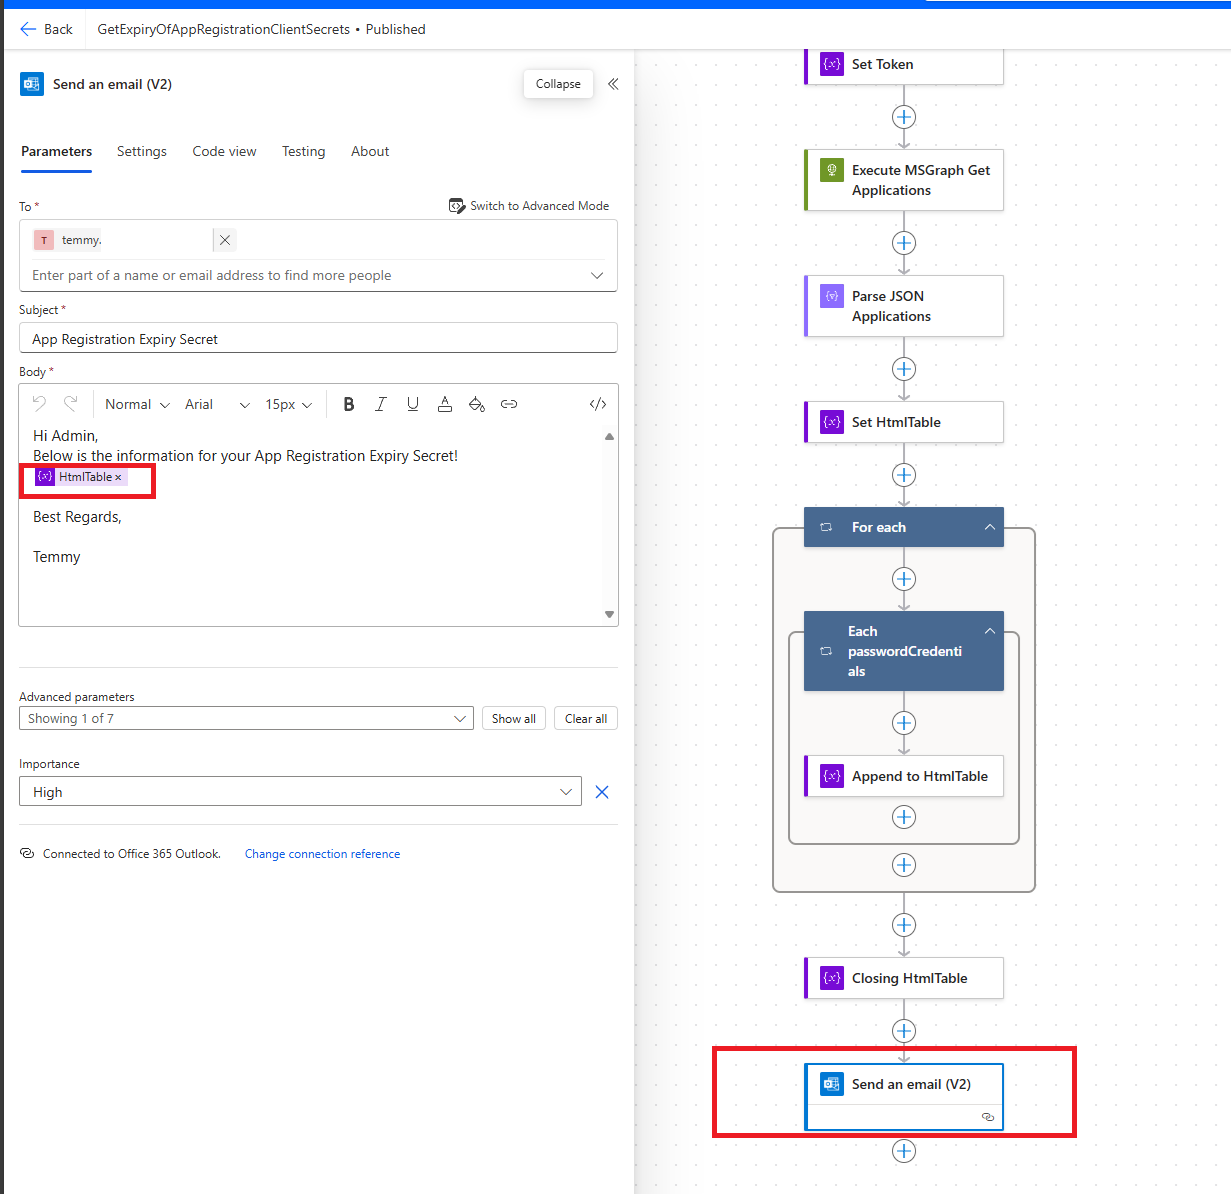
Send Email
Demo
And here is the result in my email after I triggered it:
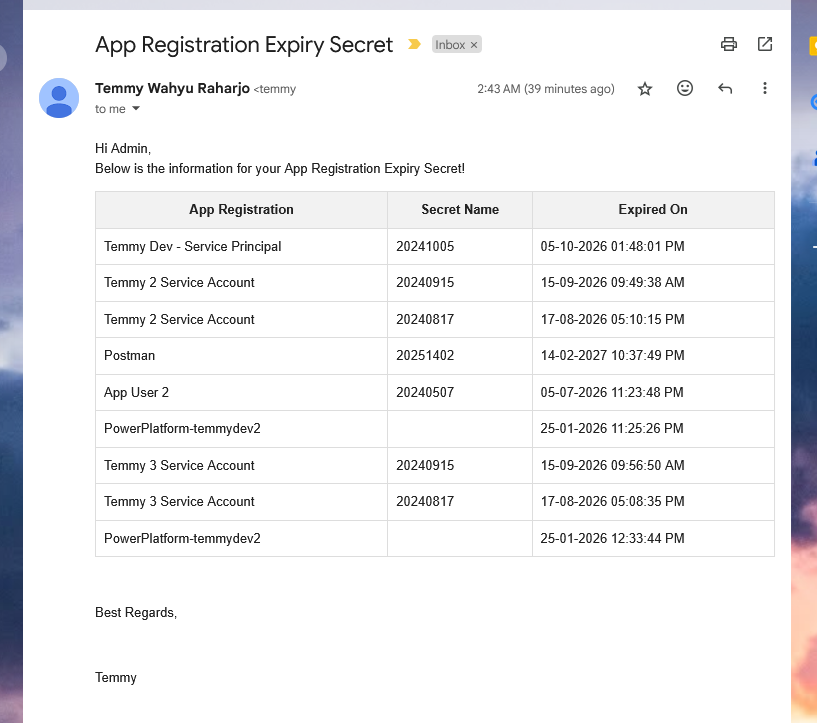
Result
Happy CRM-ing!
Leave a comment
Your comment is sent privately to the author and isn't published on the site.