.NET , Azure , dynamics-crm , low-code , powerplatform
Learn: Create Power Automate Custom Connector - API Key Authentication

Today we will learn how to create a Custom Connector from scratch and implement API Key Authentication. The authentication code that I used is the reference from the below YouTube video from Nick Chapsas:
https://www.youtube.com/watch?v=GrJJXixjR8M
Without further ado, let's learn!
Create Web API
I'm creating .NET 8.0 Web API:
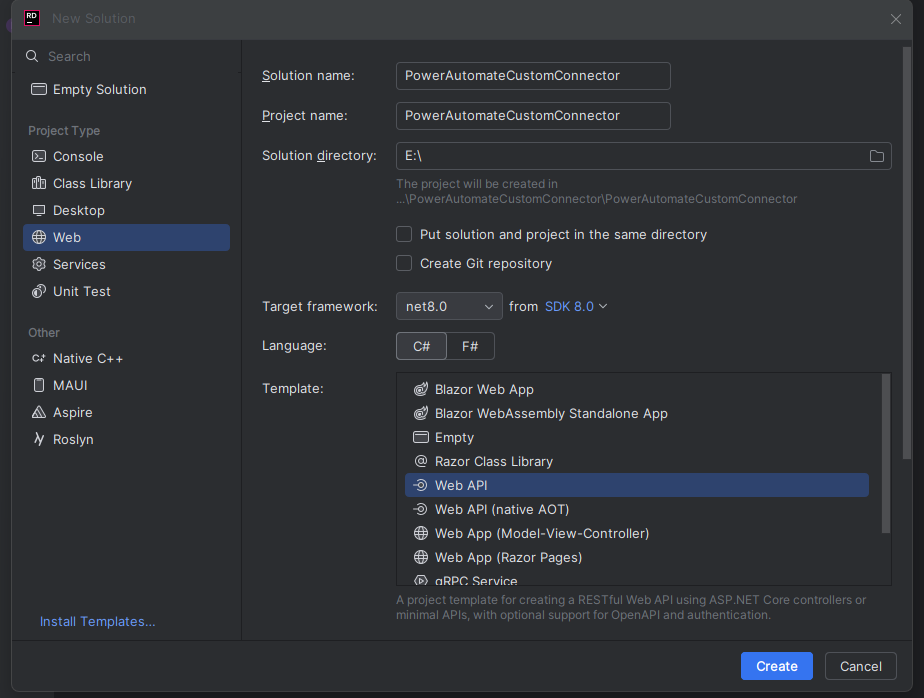
Create a Web API project using Rider
Next, we need to create an Authentication Folder > Add the below AuthConstats.cs:
namespace PowerAutomateCustomConnector.Authentication;

public static class AuthConstants
{
    public const string ApiKeySectionName = "Authentication:ApiKey";
    public const string ApiKeyHeaderName = "x-api-key";
}
ApiKeySectionName will take the value from appsettings.json (I'll show you the sample value). Meanwhile, ApiKeyHeaderName will scan the HTTP Header attributes to check if the key is correct.
Then, we need to create custom Middleware (ApiAuthenticationMiddleware.cs):
using System.Net;

namespace PowerAutomateCustomConnector.Authentication;

public class ApiAuthenticationMiddleware(RequestDelegate next, IConfiguration configuration)
{
    public async Task Invoke(HttpContext context)
    {
        if (!context.Request.Headers.TryGetValue(AuthConstants.ApiKeyHeaderName, out var extractedApiKey))
        {
            context.Response.StatusCode = (int)HttpStatusCode.Unauthorized;
            await context.Response.WriteAsync("Invalid API key.");
            return;
        }

        var apiKey = configuration.GetValue<string>(AuthConstants.ApiKeySectionName);
        if (apiKey != null && !apiKey.Equals(extractedApiKey))
        {
            context.Response.StatusCode = (int)HttpStatusCode.Unauthorized;
            await context.Response.WriteAsync("Invalid API key.");
            return;
        }

        await next(context);
    }
}
As you can see in the above Middleware, we created a function to check the Header Request to see if the API Key exists. Then, the system will check if the value matches the APIKey in the appsettings.json.
Last, in this section. We just need to glue those codes in the Program.cs:
using PowerAutomateCustomConnector.Authentication;

var builder = WebApplication.CreateBuilder(args);

// Add services to the container.
// Learn more about configuring Swagger/OpenAPI at https://aka.ms/aspnetcore/swashbuckle
builder.Services.AddEndpointsApiExplorer();
builder.Services.AddSwaggerGen();

builder.Services.AddAuthorization();
builder.Services.AddAuthentication();

var app = builder.Build();

app.UseSwagger();
app.UseSwaggerUI();

app.UseAuthorization();
app.UseAuthentication();

app.UseMiddleware<ApiAuthenticationMiddleware>();
app.UseHttpsRedirection();

var summaries = new[]
{
    "Freezing", "Bracing", "Chilly", "Cool", "Mild", "Warm", "Balmy", "Hot", "Sweltering", "Scorching"
};

app.MapGet("/weatherforecast", () =>
    {
        var forecast = Enumerable.Range(1, 5).Select(index =>
                new WeatherForecast
                (
                    DateOnly.FromDateTime(DateTime.Now.AddDays(index)),
                    Random.Shared.Next(-20, 55),
                    summaries[Random.Shared.Next(summaries.Length)]
                ))
            .ToArray();
        return forecast;
    })
    .WithName("GetWeatherForecast");

app.Run();

record WeatherForecast(DateOnly Date, int TemperatureC, string? Summary)
{
    public int TemperatureF => 32 + (int)(TemperatureC / 0.5556);
}
As you can see, we need to enable the Authorization and Authentication. Also, we need to register the custom middleware we created earlier (line 21). For the WebAPI method, I'm still using the generated sample (WeatherForecast API) as this blog post focuses on Authentication.
And here is the appsettings.json sample***:***
{
  "Authentication": {
    "ApiKey": "your-api-key"
  },
  "Logging": {
    "LogLevel": {
      "Default": "Information",
      "Microsoft.AspNetCore": "Warning"
    }
  },
  "AllowedHosts": "*"
}
WebAPI Deployment
Next, we need to deploy the API. First, as I'm using Rider > I need to install the Azure toolkit for the Rider plugin > and log in to the account that we will use for deployment > select the subscription that you want. Then, you can right-click on the Project > Publish > select Azure. If you don't have the Web App yet, you can create the Web App:
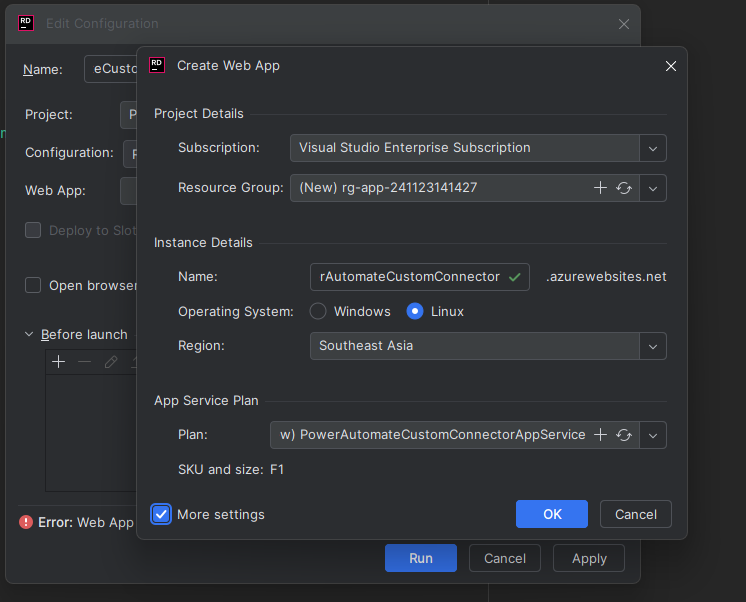
Create Web App from Azure toolkit for Rider plugin
Once created, you can select the Web App, and click the "Run" button for the deployment and you can verify if the Authentication working as intended:
Create Custom API and Try It
Open your Postman (you can refer to Learn documentation here) > Create a new collection > On the Authorization, I set it like the below screen:
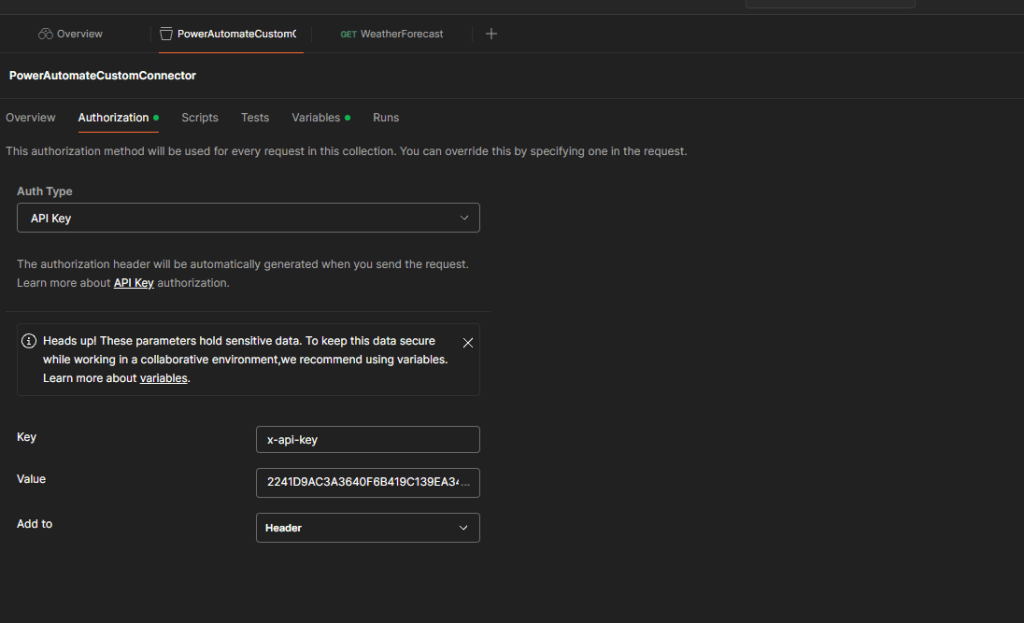
Create Authorization
Then, I also create Variables > BaseUrl:
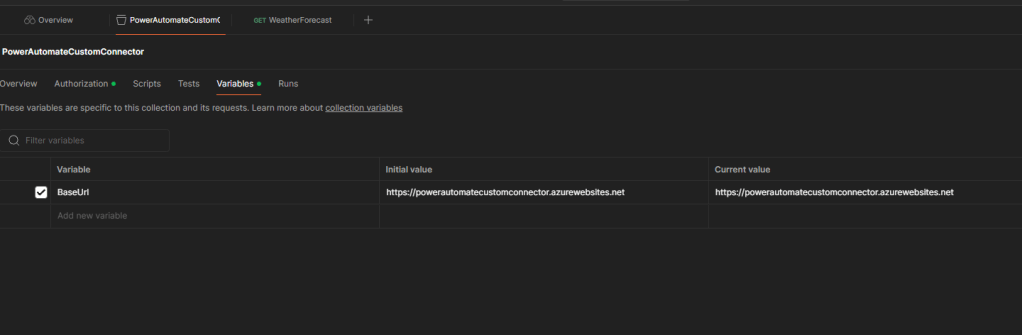
Create BaseUrl for easy testing
Last, create a get request and fill in the below:
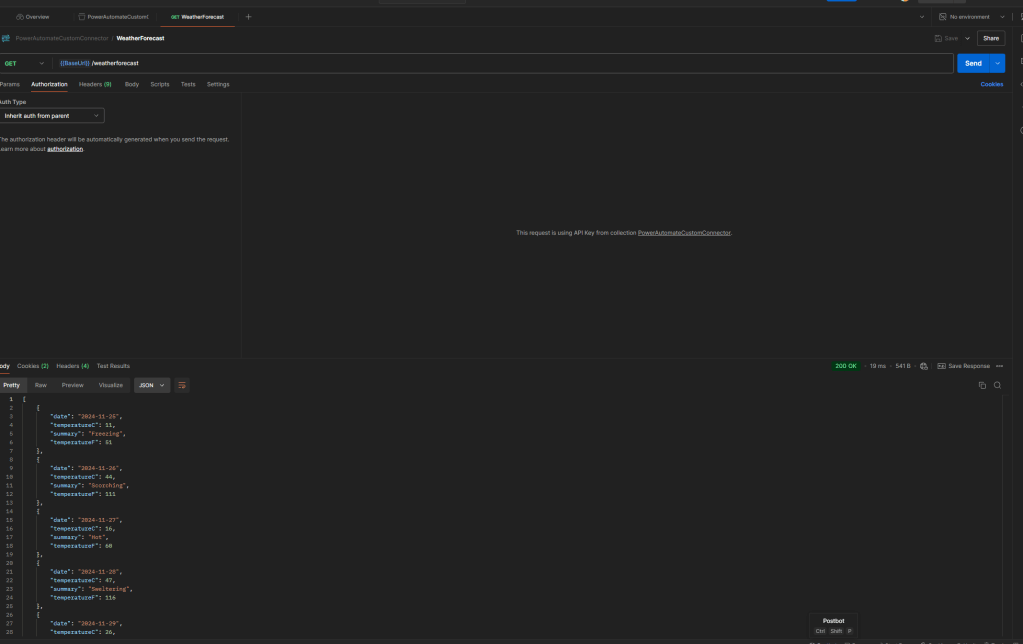
Generate WeatherForecast HTTP Request and Response
Once you do the above, you can export this Postman Collection (I'm getting a warning error if imported from OpenAPI JSON. That's why I'm recommending using Postman collection instead):
{"info": {	"_postman_id": "5116e32f-e902-40c8-a324-fc7d228cf8bc",	"name": "PowerAutomateCustomConnector",	"description": "This is sample PowerAutomateCustomConnector",	"schema": "https://schema.getpostman.com/json/collection/v2.1.0/collection.json",	"_exporter_id": "2081887"},"item": [	{		"name": "WeatherForecast",		"request": {			"method": "GET",			"header": [],			"url": {				"raw": "{{BaseUrl}}/weatherforecast",				"host": [					"{{BaseUrl}}"				],				"path": [					"weatherforecast"				]			}		},		"response": [			{				"name": "Response",				"originalRequest": {					"method": "GET",					"header": [],					"url": {						"raw": "{{BaseUrl}}/weatherforecast",						"host": [							"{{BaseUrl}}"						],						"path": [							"weatherforecast"						]					}				},				"status": "OK",				"code": 200,				"_postman_previewlanguage": "json",				"header": [					{						"key": "Content-Type",						"value": "application/json; charset=utf-8"					},					{						"key": "Date",						"value": "Sun, 24 Nov 2024 08:05:12 GMT"					},					{						"key": "Server",						"value": "Kestrel"					},					{						"key": "Transfer-Encoding",						"value": "chunked"					}				],				"cookie": [],				"body": "[\n    {\n        \"date\": \"2024-11-25\",\n        \"temperatureC\": 11,\n        \"summary\": \"Freezing\",\n        \"temperatureF\": 51\n    },\n    {\n        \"date\": \"2024-11-26\",\n        \"temperatureC\": 44,\n        \"summary\": \"Scorching\",\n        \"temperatureF\": 111\n    },\n    {\n        \"date\": \"2024-11-27\",\n        \"temperatureC\": 16,\n        \"summary\": \"Hot\",\n        \"temperatureF\": 60\n    },\n    {\n        \"date\": \"2024-11-28\",\n        \"temperatureC\": 47,\n        \"summary\": \"Sweltering\",\n        \"temperatureF\": 116\n    },\n    {\n        \"date\": \"2024-11-29\",\n        \"temperatureC\": 26,\n        \"summary\": \"Balmy\",\n        \"temperatureF\": 78\n    }\n]"			}		]	}],"auth": {	"type": "apikey",	"apikey": [		{			"key": "value",			"value": "your-api-key",			"type": "string"		},		{			"key": "key",			"value": "x-api-key",			"type": "string"		}	]},"event": [	{		"listen": "prerequest",		"script": {			"type": "text/javascript",			"packages": {},			"exec": [				""			]		}	},	{		"listen": "test",		"script": {			"type": "text/javascript",			"packages": {},			"exec": [				""			]		}	}],"variable": [	{		"key": "BaseUrl",		"value": "https://powerautomatecustomconnector.azurewebsites.net",		"type": "string"	}]
}
Next, go to make.powerapps.com > Custom Connector > New custom connector > select "Import a Postman collection":
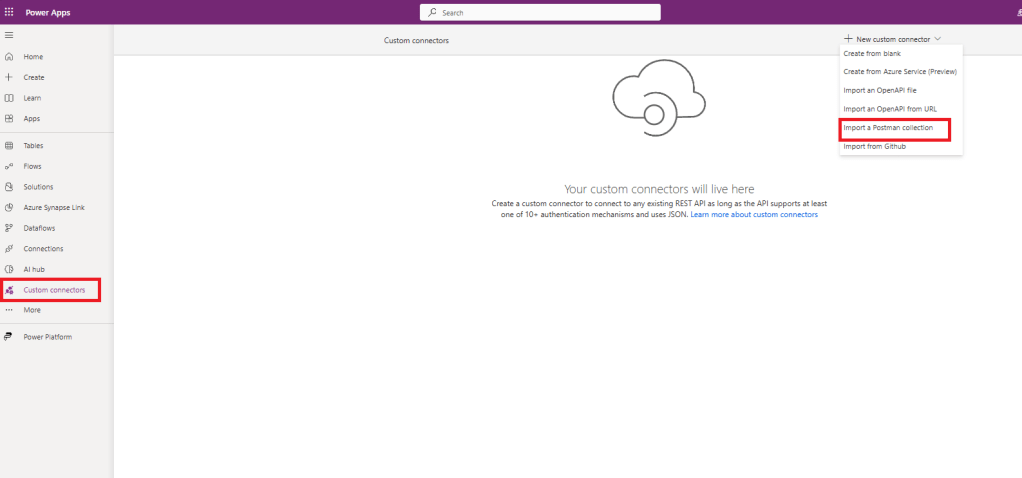
Create Custom Connector from Postman Collection
Give the name of your Custom Connector and you can select the postmancollection.json that we exported earlier > and click Continue.
On the General Information tab, you can fill in the information of your Custom Connector. For the scheme and host, please fill in based on your deployment settings.
On the Security tab, you can select API Key and fill in the below information:
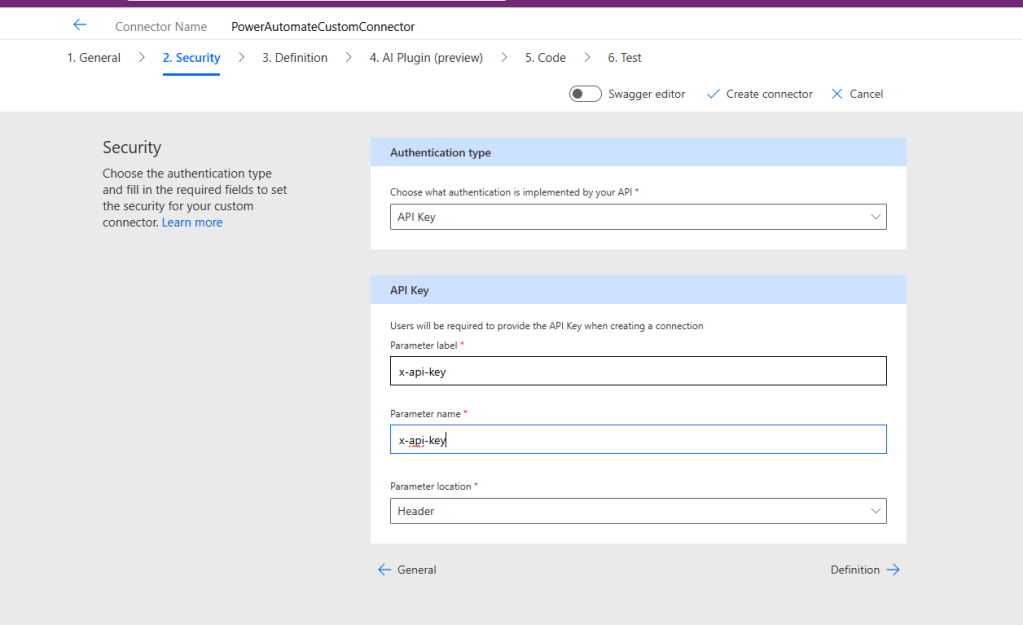
Security definition
For the Definition, you can add more information for the Summary and Description of the Operation. If you don't need it, you can skip this information and select Create the Connector.
Once created, we can go to the Test tab > create the Connection for your custom connector **** you need to provide the API Key and you can test the connector:
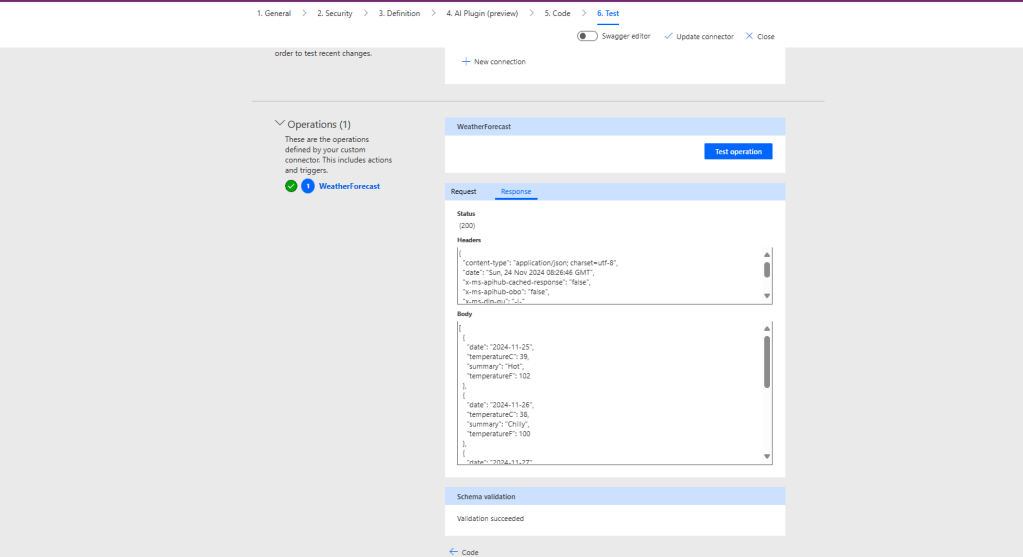
Test the Connector
Last, I created a Power Automate flow and select the Connector that we just created:
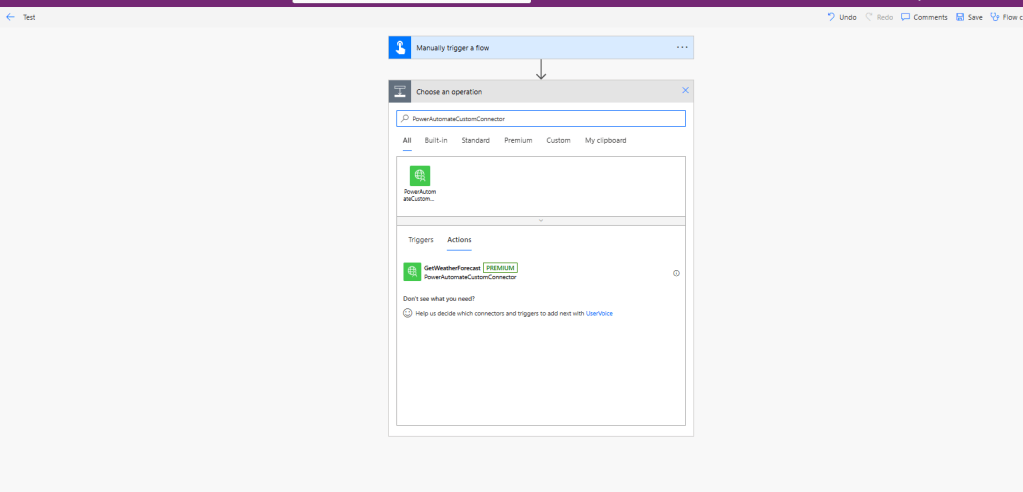
Create Power Automate Flow
Here is the testing result from the Power Automate Flow:
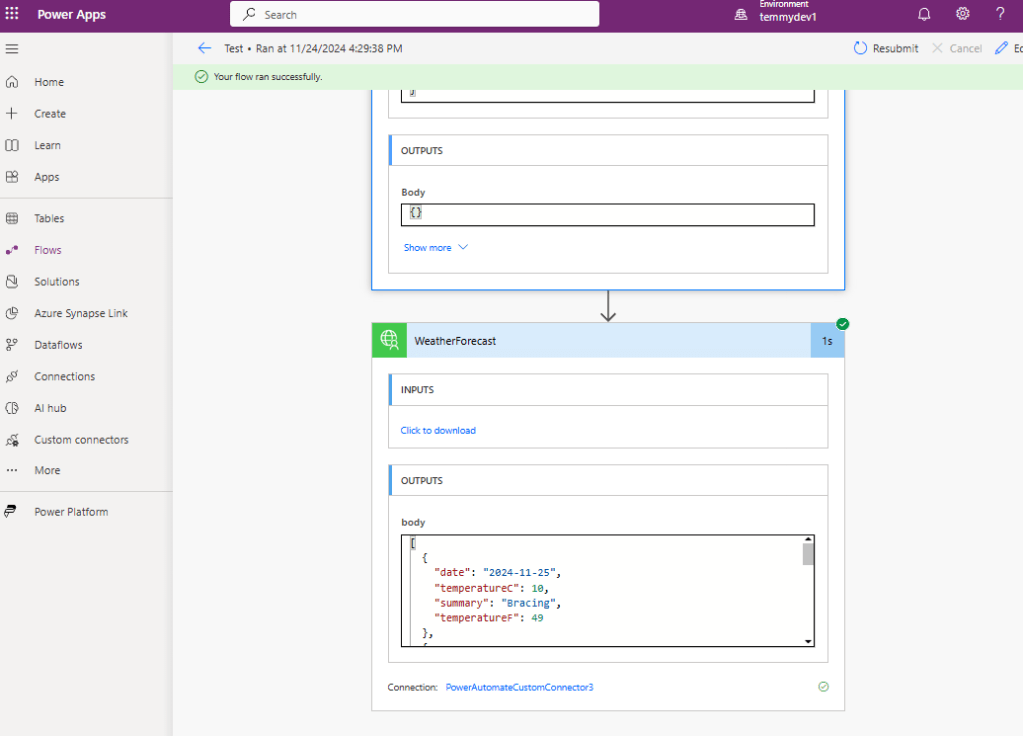
Result
Happy CRM-ing!
Leave a comment
Your comment is sent privately to the author and isn't published on the site.