AI , dynamics-crm , powerplatform
Dataverse: Learn how to create .NET MCP

With the hype of Model Context Protocol - it's kinda a plugin for LLM (Large Language Model) to interact with the external tool(s), I always wonder how to create one. For my field, which is Power Platform - Dataverse,I saw the great Natraj's GitHub repo about MCP Dataverse, and it intrigued me to explore the code so I can use it locally on my system. So, today, we will learn how to create the project from scratch (and copy-pasting and a bit modifying the code for sure 😁), and I'll try to explain the components for you!
Basically, the Dataverse MCP that Natraj created is to help LLM retrieve data from Dataverse. And for that purpose, the repo itself uses SQL4CDS by Mark Carrington to connect to Dataverse, and we need to create several components based on the MCP standards. The flow will be easier to understand by looking at the below:
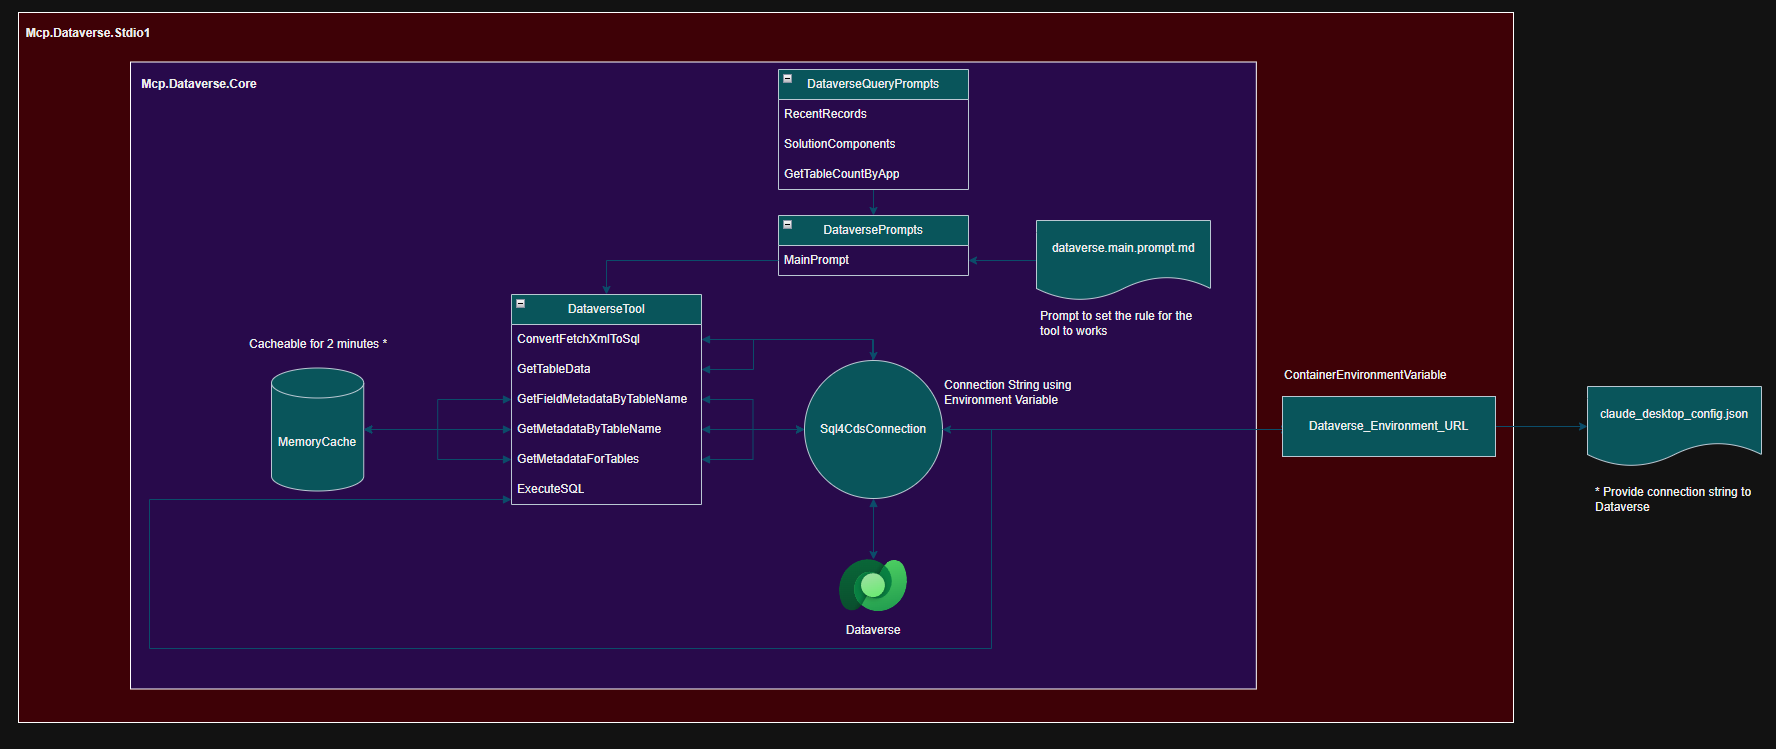
The diagram of how the component works
Prerequistes
- Visual Studio/VS Code
- Installed .NET Core (8++)
- Claude Desktop
Mcp.Dataverse.Core.csproj
First, we have a C# Library Project named Mcp.Dataverse.Core project that imported MarkMpn.Sql4Cds.Engine and also ModelContextProtocol NuGet packages:
<Project Sdk="Microsoft.NET.Sdk">

  <PropertyGroup>
    <TargetFramework>net9.0</TargetFramework>
    <ImplicitUsings>enable</ImplicitUsings>
    <Nullable>enable</Nullable>
  </PropertyGroup>

  <ItemGroup>
    <None Remove="Resources\dataverse.main.prompt.md" />
  </ItemGroup>

  <ItemGroup>
    <PackageReference Include="MarkMpn.Sql4Cds.Engine" Version="9.6.1" />
    <PackageReference Include="ModelContextProtocol" Version="0.2.0-preview.3" />
  </ItemGroup>

  <ItemGroup>
    <Resource Include="Resources\dataverse.main.prompt.md">
      <CopyToOutputDirectory>PreserveNewest</CopyToOutputDirectory>
    </Resource>
  </ItemGroup>

  <ItemGroup>
    <Compile Update="Properties\Resources.Designer.cs">
      <DesignTime>True</DesignTime>
      <AutoGen>True</AutoGen>
      <DependentUpon>Resources.resx</DependentUpon>
    </Compile>
  </ItemGroup>

  <ItemGroup>
    <EmbeddedResource Update="Properties\Resources.resx">
      <Generator>ResXFileCodeGenerator</Generator>
      <LastGenOutput>Resources.Designer.cs</LastGenOutput>
    </EmbeddedResource>
  </ItemGroup>

</Project>
dataverse.main.prompt.md
This file contains the prompt for the LLM to interact with MCP. If you read the above file, you will understand that it will set some of the rules and also how to return the message so LLM can transform the response to the output needed.
DataverseTool.cs
https://github.com/rajyraman/mcp-dataverse/blob/main/src/Mcp.Dataverse.Core/Tools/DataverseTool.cs
Next, the DataverseTool class will contain several methods:
- ExecuteSQL: This is the main function to interact with Dataverse. SQL4Cds will help to execute the query, and in this function, we will return the result as JSON output.
- ConvertFetchXmlToSql: The function where we can convert the generated FetchXML from LLM into a SQL query (using the FetchXMLToSQL function in SQL4CDS).
- GetMetadataForAllTables: Function to retrieve data from metadata.entity. This is cacheable.
- GetMetadataByTableName: Function to retrieve a specific tableName from metadata.entity. This is cacheable.
- GetFieldMetadataByTableName: Function to retrieve the metadata.attribute. This is cacheable.
- GetRowsForTable: Function to retrieve data from a specific table. The function will be dynamic, where it can pass the attributes, conditions, or order by.
DataversePrompts.cs
This class is marked as McpServerPromptType, which means that this is the exposed prompt. In this function, we bind the dataverse.main.prompt.md as the general prompt.
DataverseQueryPrompts.cs
https://github.com/rajyraman/mcp-dataverse/blob/main/src/Mcp.Dataverse.Core/Prompts/QueryPrompts.cs
Another prompt that the tool exposes to get:
- RecentRecords: prompt to retrieve the top 50 records of the table, sorted by modifiedon.
- SolutionsComponents: prompt to retrieve the solutions components of a solution.
- GetTableCountByApp: prompt to retrieve the row count for tables in the app.
BuilderExtensions.cs
I changed a bit in this class and only exposed one environment variable:
using MarkMpn.Sql4Cds.Engine;
using Microsoft.Extensions.DependencyInjection;
using Microsoft.Extensions.Hosting;
using Microsoft.PowerPlatform.Dataverse.Client;
using ModelContextProtocol;
namespace Mcp.Dataverse.Core.Extensions;

public static class BuilderExtensions
{
    //create extension method for IHostApplicationBuilder
    public static void AddDataverse(this IHostApplicationBuilder builder)
    {
        var dataverseConnectionString = Environment.GetEnvironmentVariable("DATAVERSE_CONNECTIONSTRING");

        if (string.IsNullOrEmpty(dataverseConnectionString))
        {
            throw new McpException("DATAVERSE_ENVIRONMENT_URL environment variable is not set.", McpErrorCode.InvalidRequest);
        }

        builder.Services.AddSingleton(serviceProvider =>
        {
            try
            {
                var dataverseClient = new ServiceClient(dataverseConnectionString);
                return dataverseClient;
            }
            catch (Exception ex)
            {
                throw new McpException(ex.Message, ex.InnerException);
            }
        });

        builder.Services.AddSingleton(serviceProvider =>
        {
            var dataverseClient = serviceProvider.GetRequiredService<ServiceClient>();
            return new Sql4CdsConnection(dataverseClient) { UseLocalTimeZone = true };
        });
    }
}
Basically, in the above class, we are just providing the correct connection string for Sql4CdsConnection.
Mcp.Dataverse.Stdio1.csproj
Last, we need to have a Console Project named Mcp.Dataverse.Stdioxx (this project name must be unique if you want to create your own and test it on your local). We also set the PackAsTool to true to generate a NUPKG file:
<Project Sdk="Microsoft.NET.Sdk">
<PropertyGroup>
<OutputType>Exe</OutputType>
<TargetFramework>net9.0</TargetFramework>
<ImplicitUsings>enable</ImplicitUsings>
<Nullable>enable</Nullable>
<AssemblyVersion>$([System.DateTime]::UtcNow.ToString('yyyy.MM.dd.3'))</AssemblyVersion>
<PackAsTool>true</PackAsTool>
<ToolCommandName>mcp-dataverse-temmy</ToolCommandName>
<PackageOutputPath>./nupkg</PackageOutputPath>
</PropertyGroup>
<PropertyGroup Condition="'$(Configuration)' == 'Release'">
<ContainerDevelopmentMode>Fast</ContainerDevelopmentMode>
</PropertyGroup>
<ItemGroup>
<PackageReference Include="Microsoft.Extensions.Hosting" Version="9.0.5" />
<PackageReference Include="Microsoft.VisualStudio.Azure.Containers.Tools.Targets" Version="1.22.1-Preview.1" />
</ItemGroup>
<ItemGroup>
<ContainerEnvironmentVariable Include="DATAVERSE_ENVIRONMENT_URL" />
</ItemGroup>
<ItemGroup>
<ProjectReference Include="..\Mcp.Dataverse.Core\Mcp.Dataverse.Core.csproj" />
</ItemGroup>
<ItemGroup>
<None Update="Properties\launchSettings.json">
<CopyToOutputDirectory>Never</CopyToOutputDirectory>
</None>
</ItemGroup>
<Target Name="PreBuild" BeforeTargets="PreBuildEvent">
<Exec Command="powershell -Command "$processes = Get-Process -Name \"mcp.dataverse.stdio1\" -ErrorAction SilentlyContinue; if ($processes) { $processes | Stop-Process -Force }"" IgnoreExitCode="true" />
</Target>
</Project>
Again, if you want to test your own local build. You need to make the Project name unique. Otherwise, when you try to register it, it will download the tool that has been registered on NuGet.
The ToolCommandName will also be used when we want to register the tool in the Claude Desktop config JSON.
Program.cs
https://github.com/rajyraman/mcp-dataverse/blob/main/src/Mcp.Dataverse.Stdio/Program.cs
In this class, we just register the McpServer by calling AddMcpServer(), register the Prompts DataverseQueryPrompts and DataversePrompts, and register the DataverseTool!
Once the program is ready > you can build it. Then, we can open Terminal in Mcp.Dataverse.Stdioxx and execute:
dotnet pack
Once the pack is done, you can run the below:
dotnet tool install --global --add-source ./nupkg Mcp.Dataverse.Stdioxx
Again, if there are changes that you need to make. You need to exit the Claude Desktop > then run the below command in Terminal:
dotnet tool uninstall -g Mcp.Dataverse.Stdioxx
Then, you can re-run the dotnet pack and dotnet tool install in the above.
Register The Tool in Claude Desktop
Open your Claude Desktop > click hamburger icon (Options) > File > click Settings > Developer > Edit Config button. It will open the Folder and select the claude_desktop_config.json file. Modify the JSON and set it like below:
{
    "mcpServers": {
        "dataverse": {
            "type": "stdio",
            "command": "mcp-dataverse-temmy",
            "env": {
                "DATAVERSE_CONNECTIONSTRING": "AuthType=ClientSecret;Url=https://xxx.crm.dynamics.com;ClientId=clientid;ClientSecret=clientsecret"
            }
        }
    }
}
You need to change the "command" based on the value that you set in the McpDataverse.Stdioxx.csproj. Then, you also need to provide the correct DATAVERSE_CONNECTIONSTRING.
Once you save the file, you can close the Claude Desktop and re-open it for testing!
Demo
Once the Claude Desktop reopens, you can start querying the data from your Dataverse:
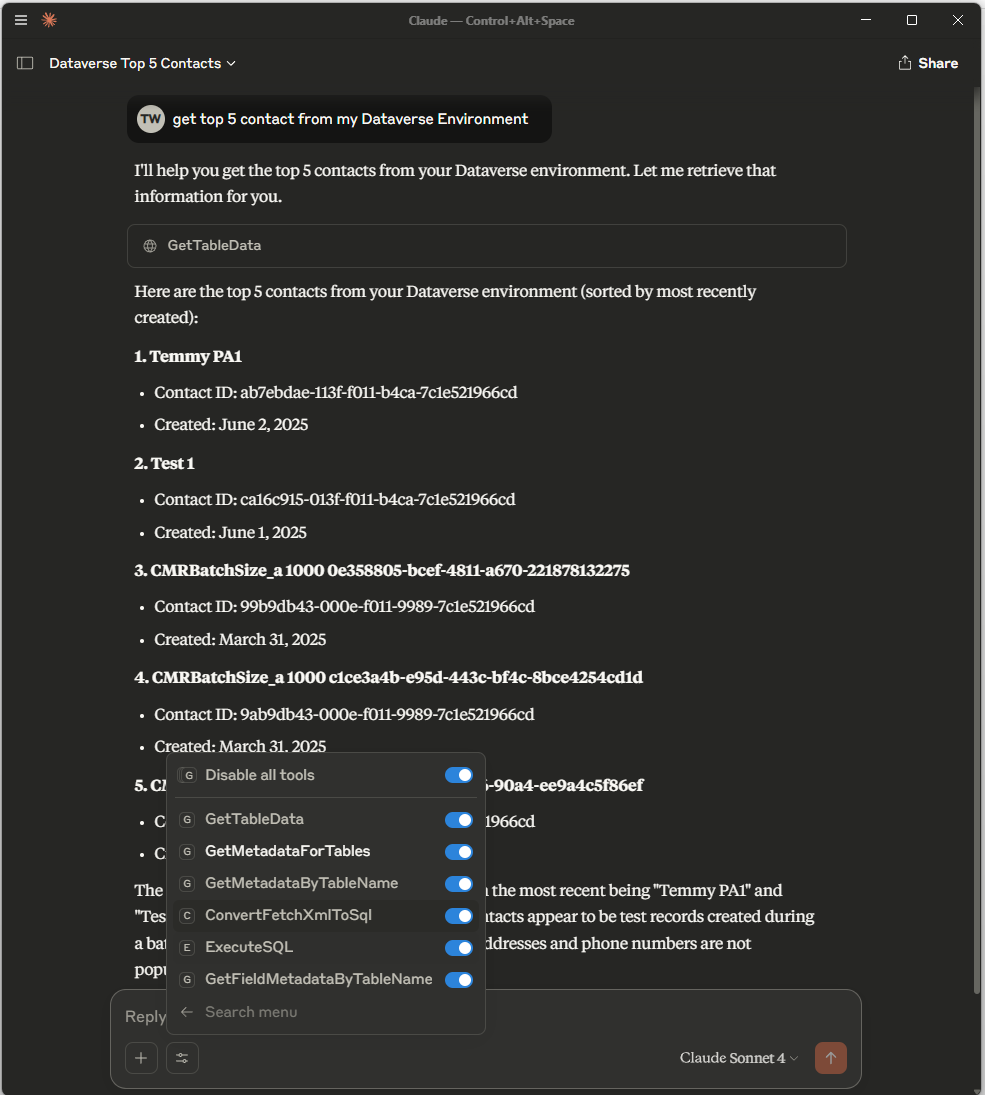
Demo
Happy CRM-ing! 🚀
Leave a comment
Your comment is sent privately to the author and isn't published on the site.